LucidHarmony is an AI-powered chord progression generator and harmonic editor for your DAW. Our custom AI model is trained on centuries of music theory and 3,700+ compositions from master composers, delivering musically intelligent chord progressions instantly.
LucidHarmony is for all kinds of music
While our AI models are trained on historical master composers, these foundational harmonic principles underpin all modern music — from contemporary pop and ambient to cinematic and experimental genres. LucidHarmony lets you dial in exactly how adventurous you want to be, with controls to embrace modern, unexpected harmonies and extended chords like 7ths, 9ths, and sus chords. Start with timeless foundations, then push into uncharted territory.
Why LucidHarmony?
Depending on your instrument, your first chord sequence with the default settings may sound like a choir. That’s no accident, because a lot of the foundation for modern music is from the choral works of Bach and other masters. We understand if you’re skeptical at first, but we encourage you to give it a try.
Then start to generate sequences with longer chords that let lush pads play out. Suddenly you’re writing the foundation for ambient soundscapes.
Platform Availability
Available for Mac (Apple Silicon only as of v1.3.x; Intel supported in v1.2.x), Linux (Intel and ARM64), and Windows (Intel, ZIP, and installer). Mac supports AU, AUv3, VST3, and CLAP formats. Windows and Linux support VST3 and CLAP.
Tested DAWs
Works with any DAW that supports VST3, AU, AUv3, or CLAP plugins. Tested with Reaper, Ableton Live, and Logic Pro.
If you find a DAW that doesn’t work, please submit a support ticket.
Controls Overview
Here is your quick start and highlights of the controls. More details as we go along.
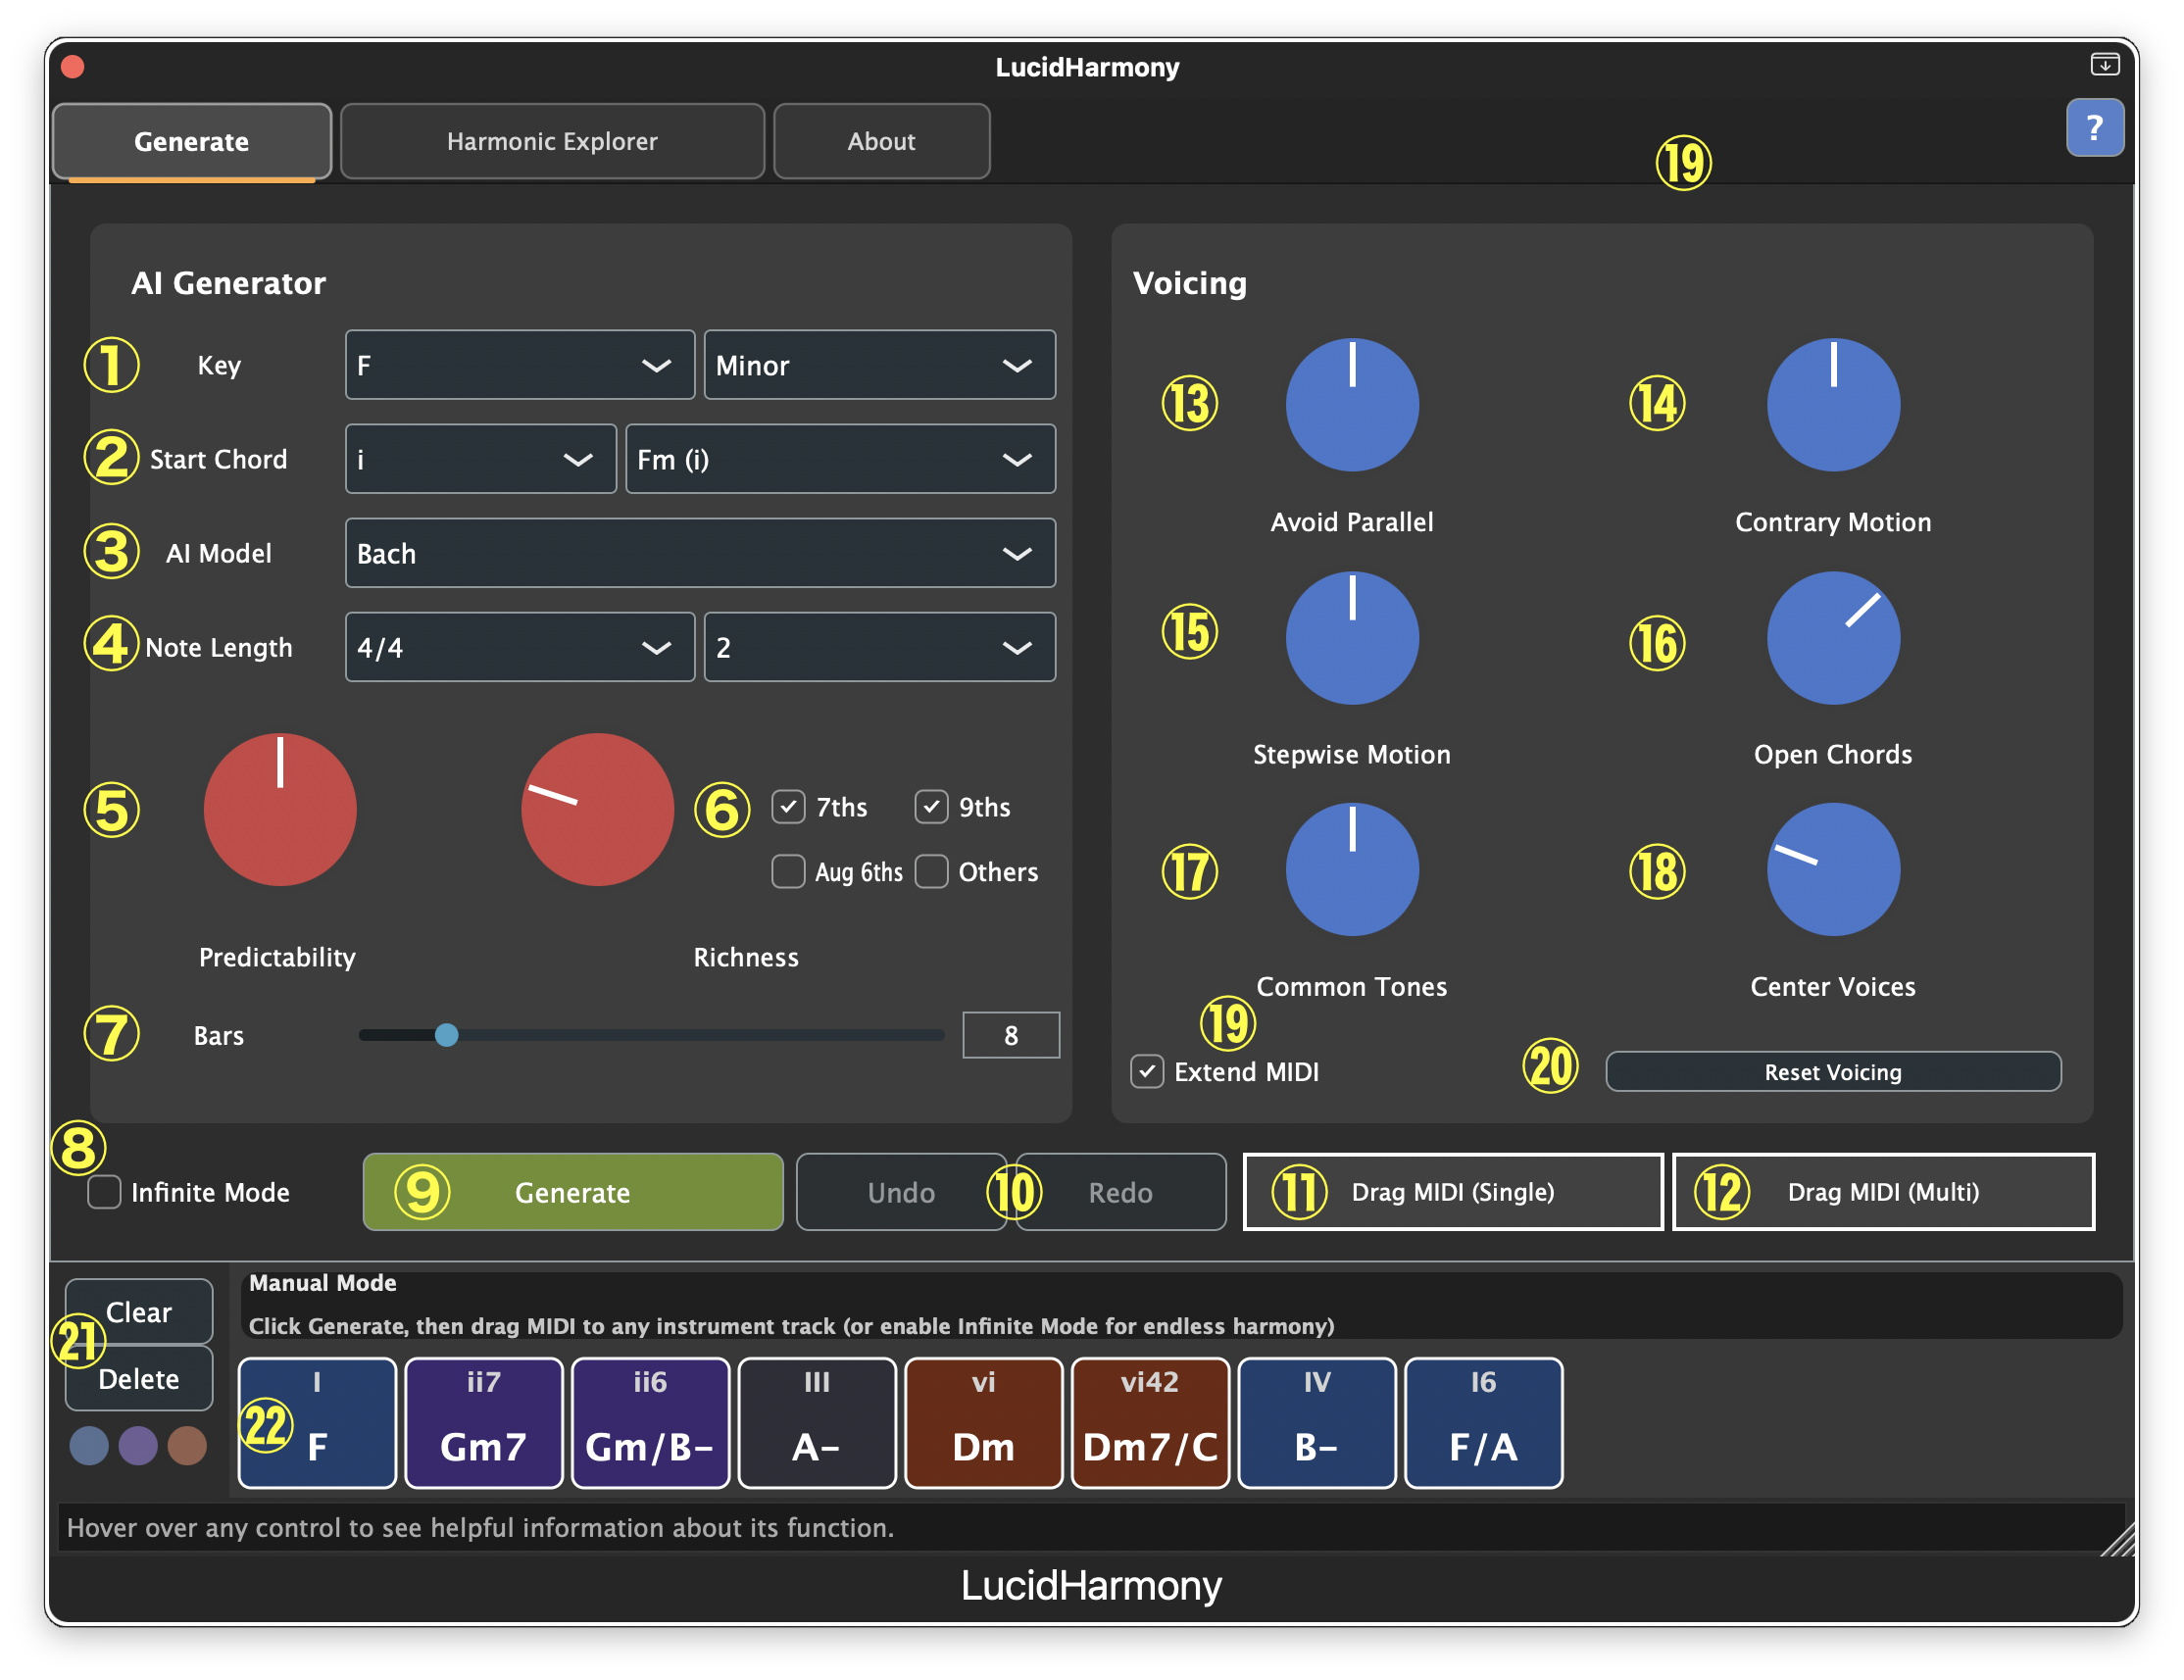
LucidHarmony’s interface is organized into three main tabs: Generate, Harmonic Explorer, and About. The Generate tab (shown above) contains all the core controls for creating chord progressions.
AI Generator Section
- 1. Key — Select the tonal center for your progression (C, D, E♭, etc.). Works with both Major and Minor modes.
- 2. Start Chord — Choose the first chord of your progression in two parts: a Roman numeral (I–VII or i–vii in minor) and a Variant dropdown that combines inversions and extensions (e.g., root position, 1st inversion, 7th, maj7, dim, aug, sus4, add9). The Variant dropdown is dynamically populated based on the selected AI model’s vocabulary.
- 3. AI Model — Select which composer’s harmonic style to emulate: Bach, Corelli, Monteverdi, Palestrina, or Trecento. Each has distinct characteristics, detailed in the Getting Started section.
- 4. Time Signature & Note Length — Set the meter for the generated progression. Options: 4/4, 3/4, 2/4, 6/8, 12/8, 5/4, 7/8. Affects how the generated MIDI is rhythmically organized. Note Length controls how many bars each chord lasts. Options: 1/8, 1/4, 1/2, 1, 2, 4, 8, 16. Shorter values for fast-moving progressions, longer values for ambient pads.
- 5. Predictability — Red dial controlling how familiar or surprising the progressions feel. Five levels: Very Familiar, Familiar, Balanced, Surprising, Very Surprising.
- 6. Richness & Extension Bias — Red dial controlling chord complexity. Five levels: Simple, Some Color, Colorful, Rich, Very Rich. Higher levels add 7ths, 9ths, and extended harmonies. Four toggles (7ths, 9ths, Aug 6ths, Others) appear next to the Richness dial. When Richness is above Simple, these control which chord extension types are biased in generation. “Others” biases toward remaining extended chords (sus, add9, etc.) independently from the other three.
- 7. Bars — Slider setting the total number of chords to generate.
- 8. Infinite Mode — Checkbox to enable continuous generation. When enabled with “Reset on Play,” LucidHarmony generates new progressions each time you press play in your DAW.
- 9. Generate Button — Click to create a new chord progression based on your settings. You can click this as many times as you want.
- 10. Undo/Redo — Step backward or forward through your generation history.
MIDI Export
- 11. Drag MIDI (Single) — Drag this to export all four voices on a single MIDI track. Perfect for choir, pad, or piano sounds.
- 12. Drag MIDI (Multi) — Drag this to export each voice on a separate MIDI track. Ideal for assigning different instruments to each voice.
MIDI Metadata: Exported MIDI files include chord symbol text markers (MIDI meta event type 6) and cue points (type 7) at each chord change. These appear as markers in DAWs that support MIDI meta events, making it easy to see chord names in your arrangement.
Voicing Section
Six blue dials control how the chords are voiced across the four parts:
- 13. Avoid Parallel — Reduces parallel fifths and octaves between voices for smoother, more traditional voice leading.
- 14. Contrary Motion — Encourages voices to move in opposite directions, creating independence between parts.
- 15. Stepwise Motion — Prefers small intervals (seconds and thirds) over large leaps for smooth melodic lines.
- 16. Open Chords — Controls spacing between voices. Higher values create wider, more spacious voicing.
- 17. Common Tones — Extends MIDI notes across chord changes where voices share the same pitch, creating smoother transitions.
- 18. Center Voices — Keeps each voice part around the middle of its range rather than wandering too high or low.
- 19. Extend MIDI — Checkbox to extend MIDI note lengths across chord boundaries where common tones occur.
- 20. Reset Voicing — Button to return all voicing parameters to default balanced settings.
Utility Controls
- 21. Reset — Reset the chord tape to a single start chord.
- 22. Chord Tape — Generated chords appear here. Click to select, right-click to edit, drag to rearrange. Chords play with DAW transport or drag to an instrument track. See Chord Tape Editing for details.
Installation
System Requirements
macOS requires macOS 11.0 (Big Sur) or later. Version 1.3.x and above requires Apple Silicon (M1/M2/M3/M4). Intel Mac users can continue using version 1.2.x with all existing features. Needs a DAW compatible with AU, AUv3, VST3, or CLAP.
Windows requires Windows 10 or later (64-bit) with a VST3- or CLAP-compatible DAW.
Linux requires a 64-bit distribution with Intel or AMD processor and a VST3- or CLAP-compatible DAW.
Download
Visit lucidmusician.com and click the Gumroad link to download the latest version for your platform. You will get an email with download details and can download as many times as needed. No installation limits — install on multiple computers.
Installation Steps
macOS
- Download the
.pkgfile for macOS - Run the installer — double-click the downloaded package
- Follow the installation wizard — plugins install automatically to:
- AU:
~/Library/Audio/Plug-Ins/Components/ - AUv3:
~/Library/Audio/Plug-Ins/Components/(same location, AUv3 variant) - VST3:
~/Library/Audio/Plug-Ins/VST3/ - CLAP:
~/Library/Audio/Plug-Ins/CLAP/
- AU:
- Rescan plugins in your DAW:
- Logic Pro: Preferences → Plug-in Manager → Reset & Rescan
- Ableton Live: Preferences → Plug-ins → Rescan
- Reaper: Preferences → Plug-ins → VST → Re-scan
Windows
Option 1: EXE Installer (Recommended)
- Download the
.exeinstaller for Windows - Run the installer — double-click the downloaded file
- Choose installation location (default recommended):
- VST3:
C:\Program Files\Common Files\VST3\ - CLAP:
C:\Program Files\Common Files\CLAP\
- VST3:
- Rescan plugins in your DAW:
- FL Studio: Options → Manage Plugins → Find Plugins
- Cubase: Studio → VST Plug-in Manager → Update Plug-in Information
- Reaper: Preferences → Plug-ins → VST → Re-scan
Option 2: ZIP Archive (Portable)
- Download the
.zipfile for Windows - Extract the archive to a temporary location
- Copy the plugin files to your VST3 directory:
- CLAP: Copy the
CLAPfolder contents toC:\Program Files\Common Files\CLAP\ - VST3: Copy the
VST3\LucidHarmony.vst3folder toC:\Program Files\Common Files\VST3\
- CLAP: Copy the
- Rescan plugins in your DAW (same as above)
Linux
- Download the
.tar.gzfile for Linux - Extract the archive to a temporary directory
- Copy plugin files to your plugin directories:
- VST3:
~/.vst3/ - CLAP:
~/.clap/
- VST3:
- Rescan plugins in your DAW:
- Ardour: Preferences → Plug-ins → Rescan
- Reaper: Preferences → Plug-ins → VST → Re-scan
Licensing
LucidHarmony uses a simple, hassle-free licensing system. The full price is $20 (currently 50% off at $10) with a 30-day money-back guarantee. You’ll get your license key when you download — just enter it in the plugin interface. If you don’t enter a license key, the plugin will show a friendly nag, but we will never block or disable any features or functionality. You can install as many times as you like without restriction.
Works offline once installed, although we check the license and whether there’s an upgrade available about once a week. This will not block any features or operation.
Setting Up the Plugin
LucidHarmony is a MIDI FX plugin that generates MIDI data only — it does not produce audio directly. You need to route the generated MIDI to a software instrument (synth, piano, strings, etc.) to hear sound.
Logic Pro
Logic Pro makes this easy by allowing both MIDI FX and instruments on the same track.
- Create a new Software Instrument track
- Add your desired instrument (e.g., Alchemy, ES2, or any third-party synth)
- In the MIDI FX slot (above the instrument), add LucidHarmony
- LucidHarmony will now generate MIDI that flows directly into your instrument
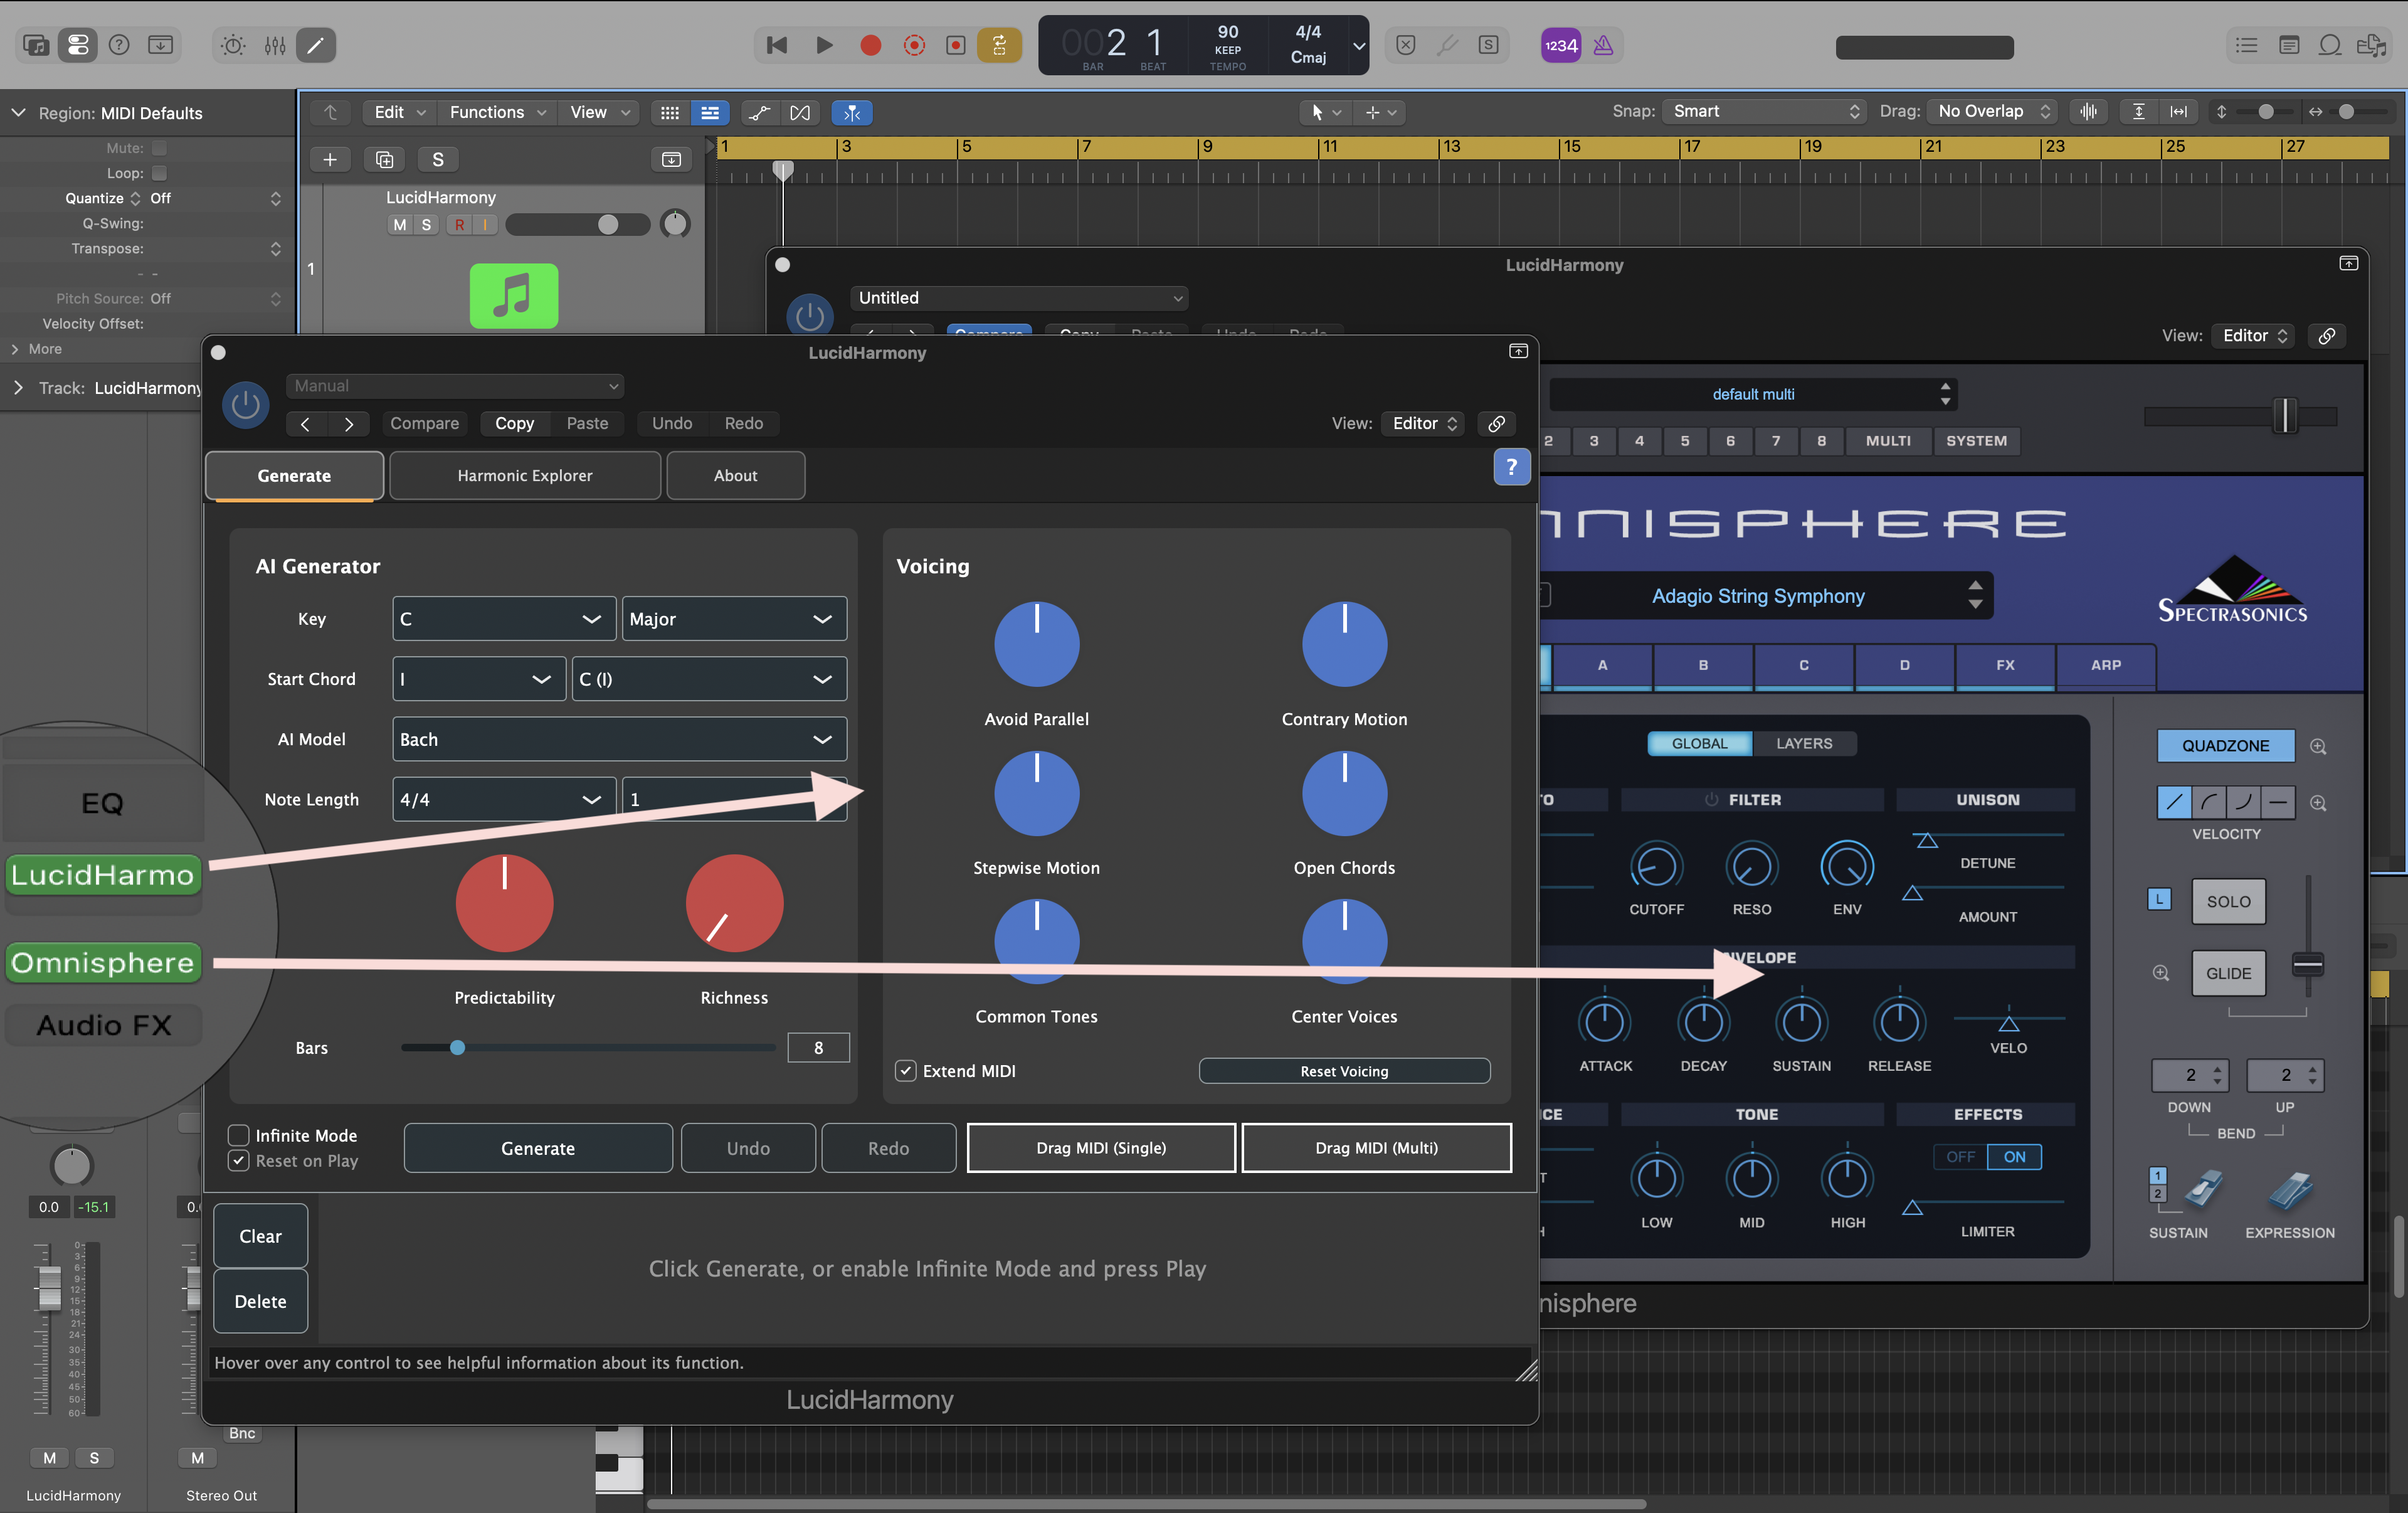
Why this works: Logic Pro’s track architecture allows MIDI FX to sit in the signal chain before the instrument, so the generated MIDI automatically routes to the instrument below it.
⚠️ Important: If you’re using LucidHarmony as a MIDI FX on a track with an instrument, don’t drag MIDI to that same track. Having two MIDI sources (LucidHarmony generating + dragged MIDI clips) on one track creates conflicts. LucidHarmony will warn you if it detects this. Best practice: Keep LucidHarmony on a track without an instrument assigned, then drag MIDI to a separate dedicated instrument track. Like this.
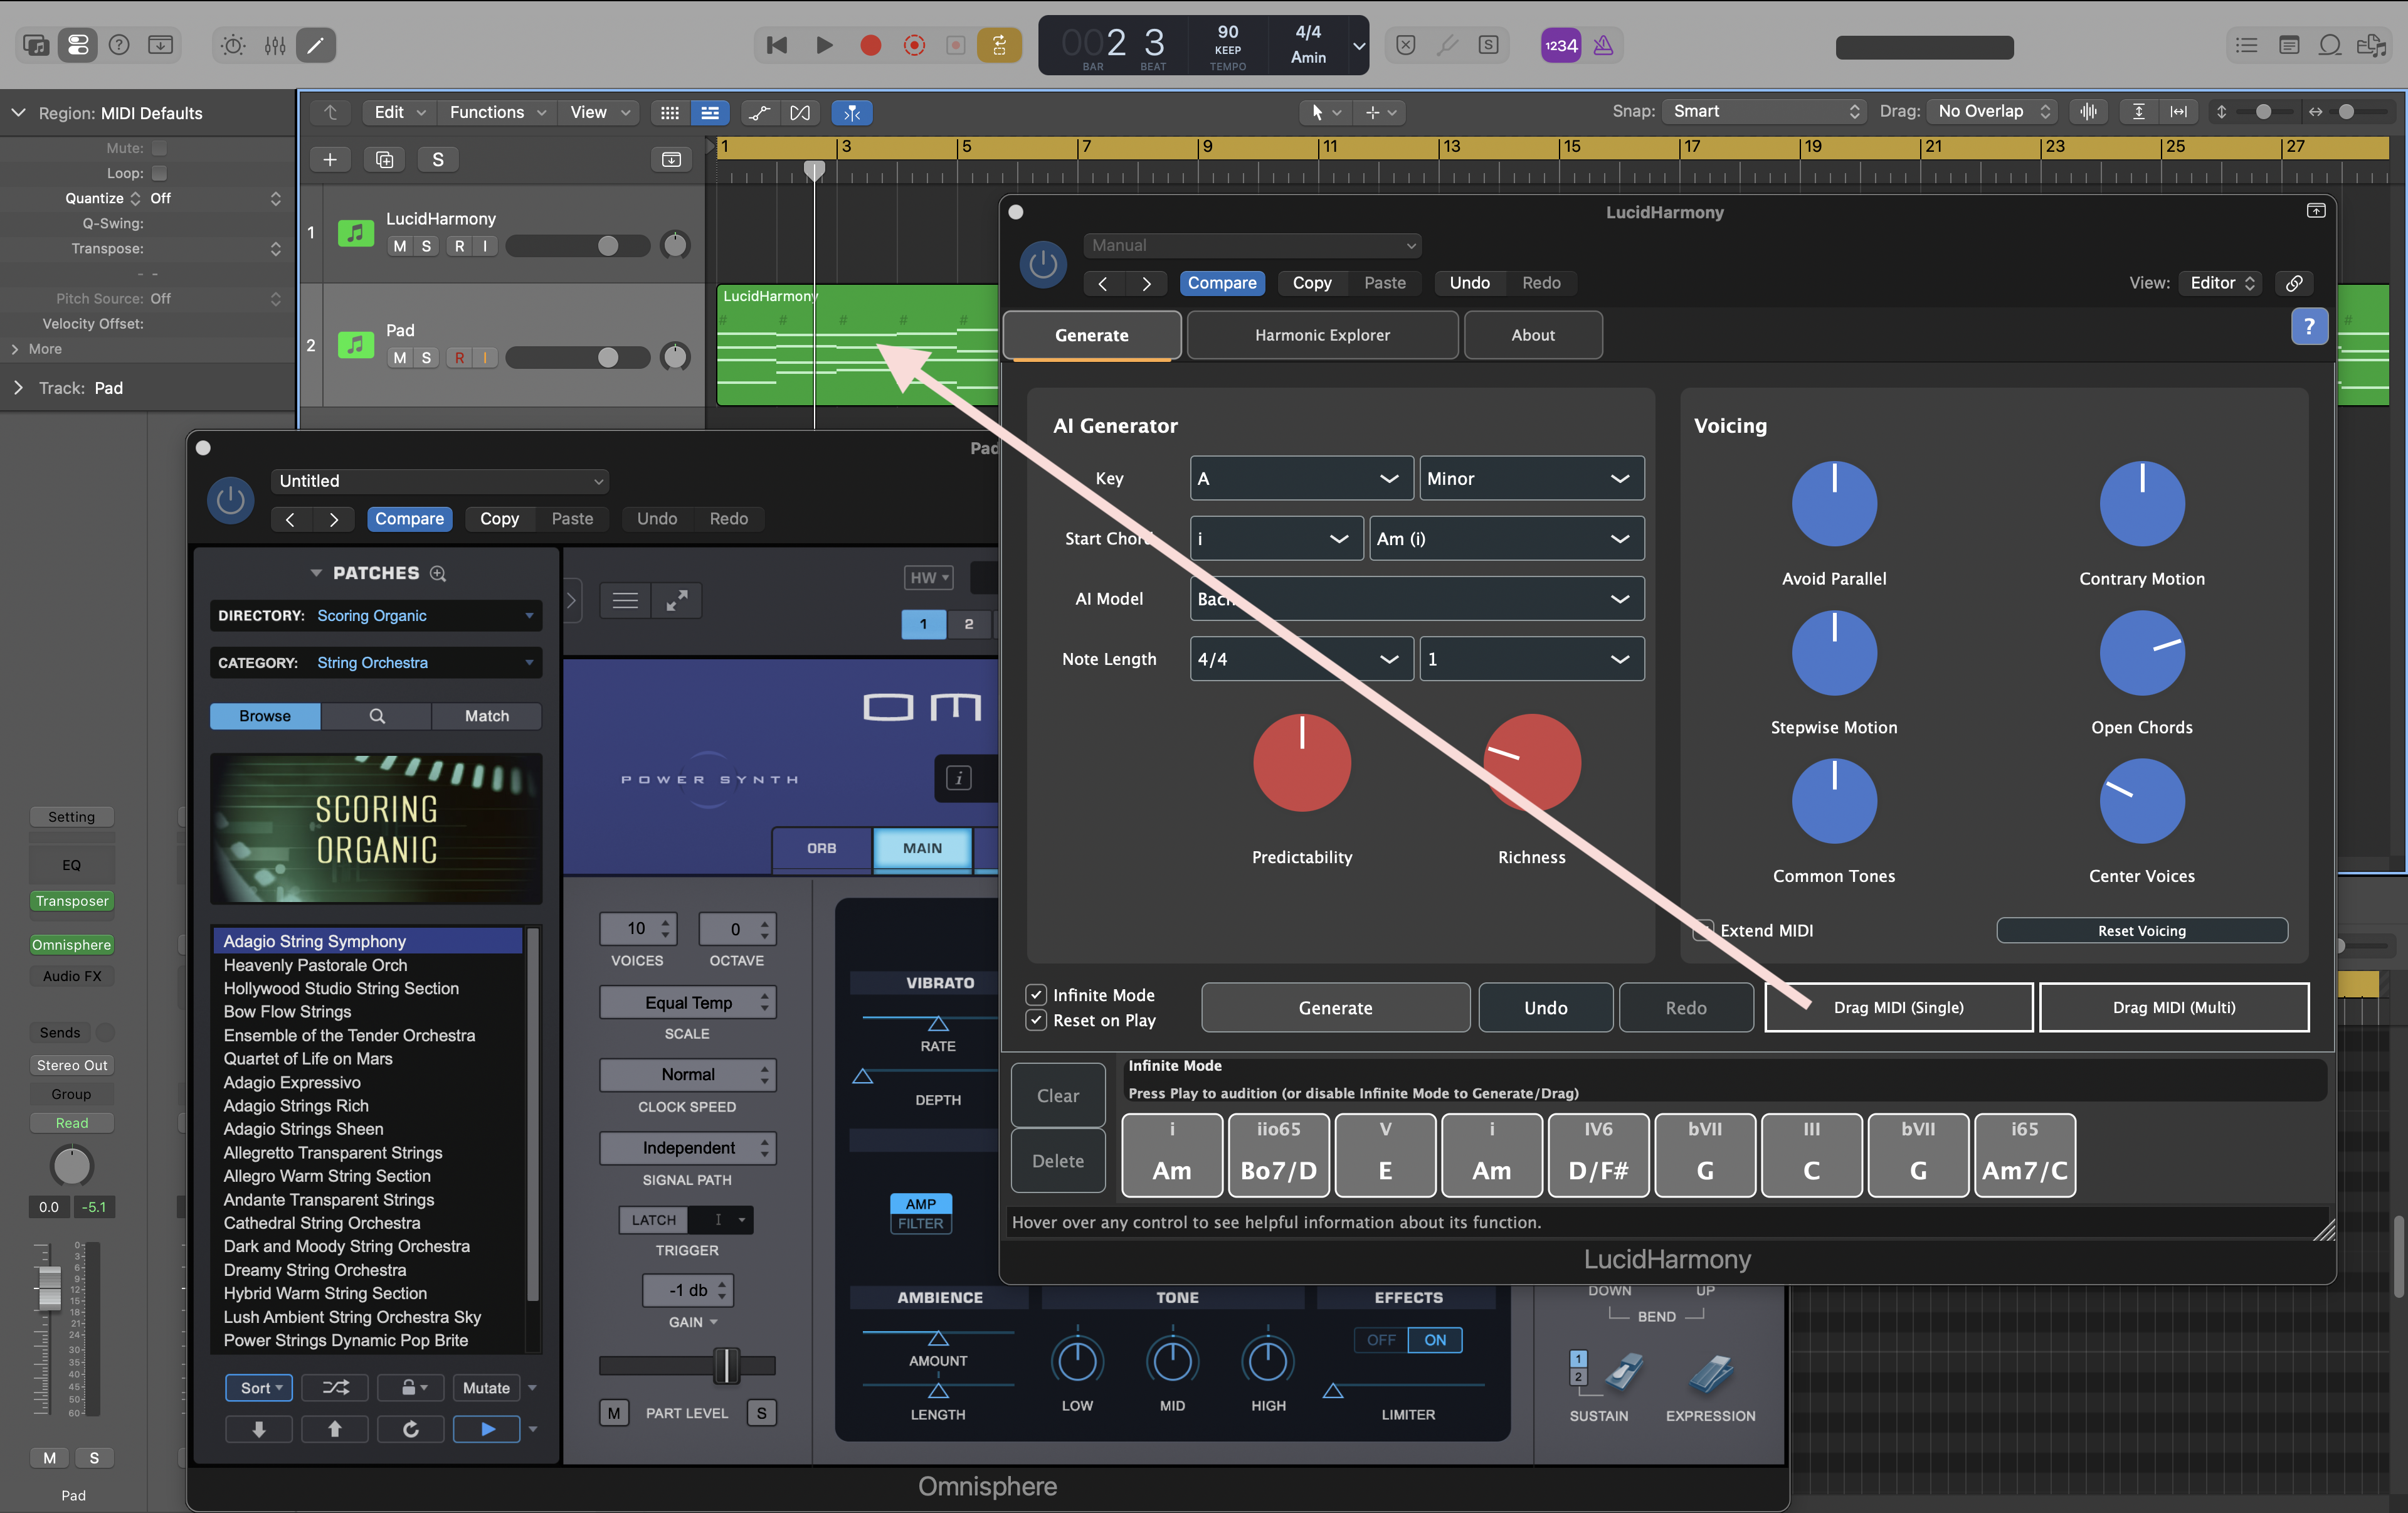
So a better alternative (a favorite of many users) is to assign LucidHarmony to a track without an instrument and drag MIDI to your instrument track. Dragging MIDI feels instant in LucidHarmony, even with 100+ AI-generated chords because LucidHarmony takes < 1ms to generate the next chord. We worked super hard on that.
Ableton Live
Ableton Live uses a routing approach with separate MIDI and instrument tracks.
- Create a new MIDI track for LucidHarmony
- Add LucidHarmony to the MIDI track (it will appear in the device chain)
- Create a second MIDI track for your instrument
- Add your desired instrument to the second track (e.g., Wavetable, Analog, or any plugin)
- On the LucidHarmony track, set MIDI To to the instrument track
- Set the instrument track’s Monitor to “In”
- Arm the LucidHarmony track for recording
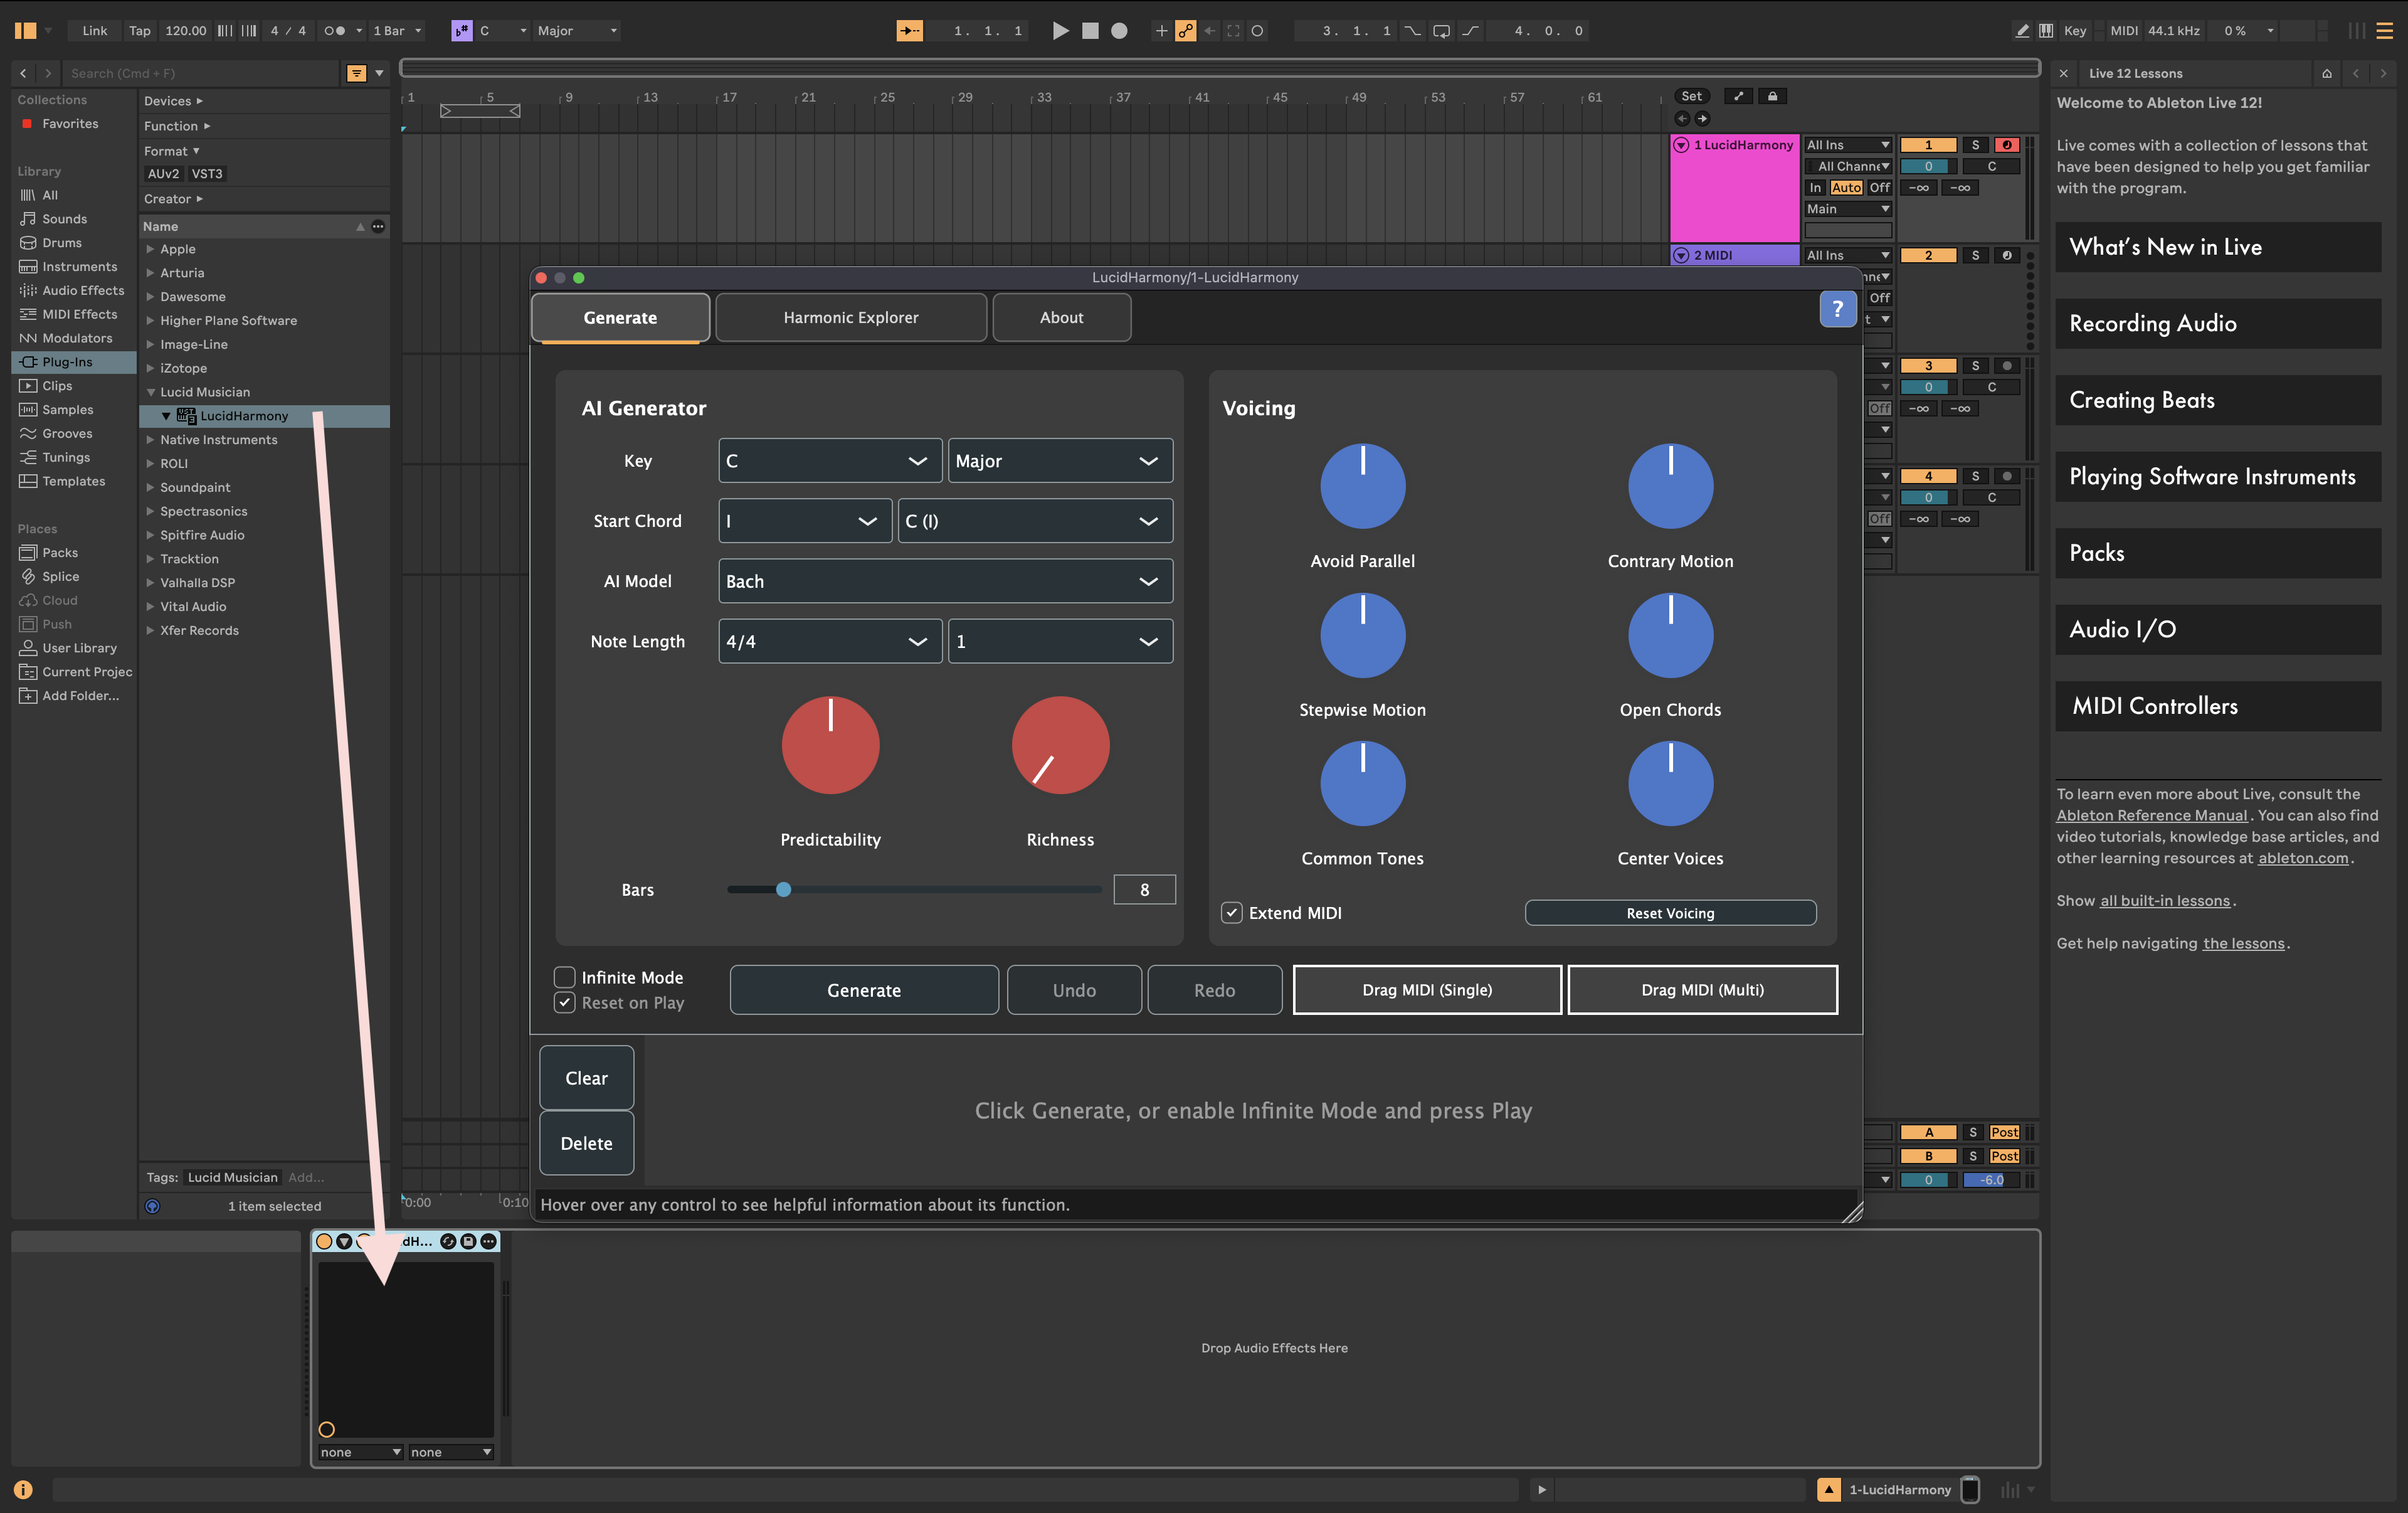
Why this works: Ableton’s routing system sends MIDI from one track to another. The LucidHarmony track generates MIDI and routes it to the instrument track, which produces the audio.
Reaper
Reaper offers flexible routing similar to Ableton but with its own approach.
- Create a new track for LucidHarmony
- Add LucidHarmony as a VST instrument (even though it’s MIDI-only)
- Create a second track for your instrument
- Add your desired instrument to the second track
- On the LucidHarmony track, click the Route button
- Add a send to the instrument track
- Set the send to MIDI (not audio)
- On the instrument track, set Record: input (MIDI) to receive from the LucidHarmony track
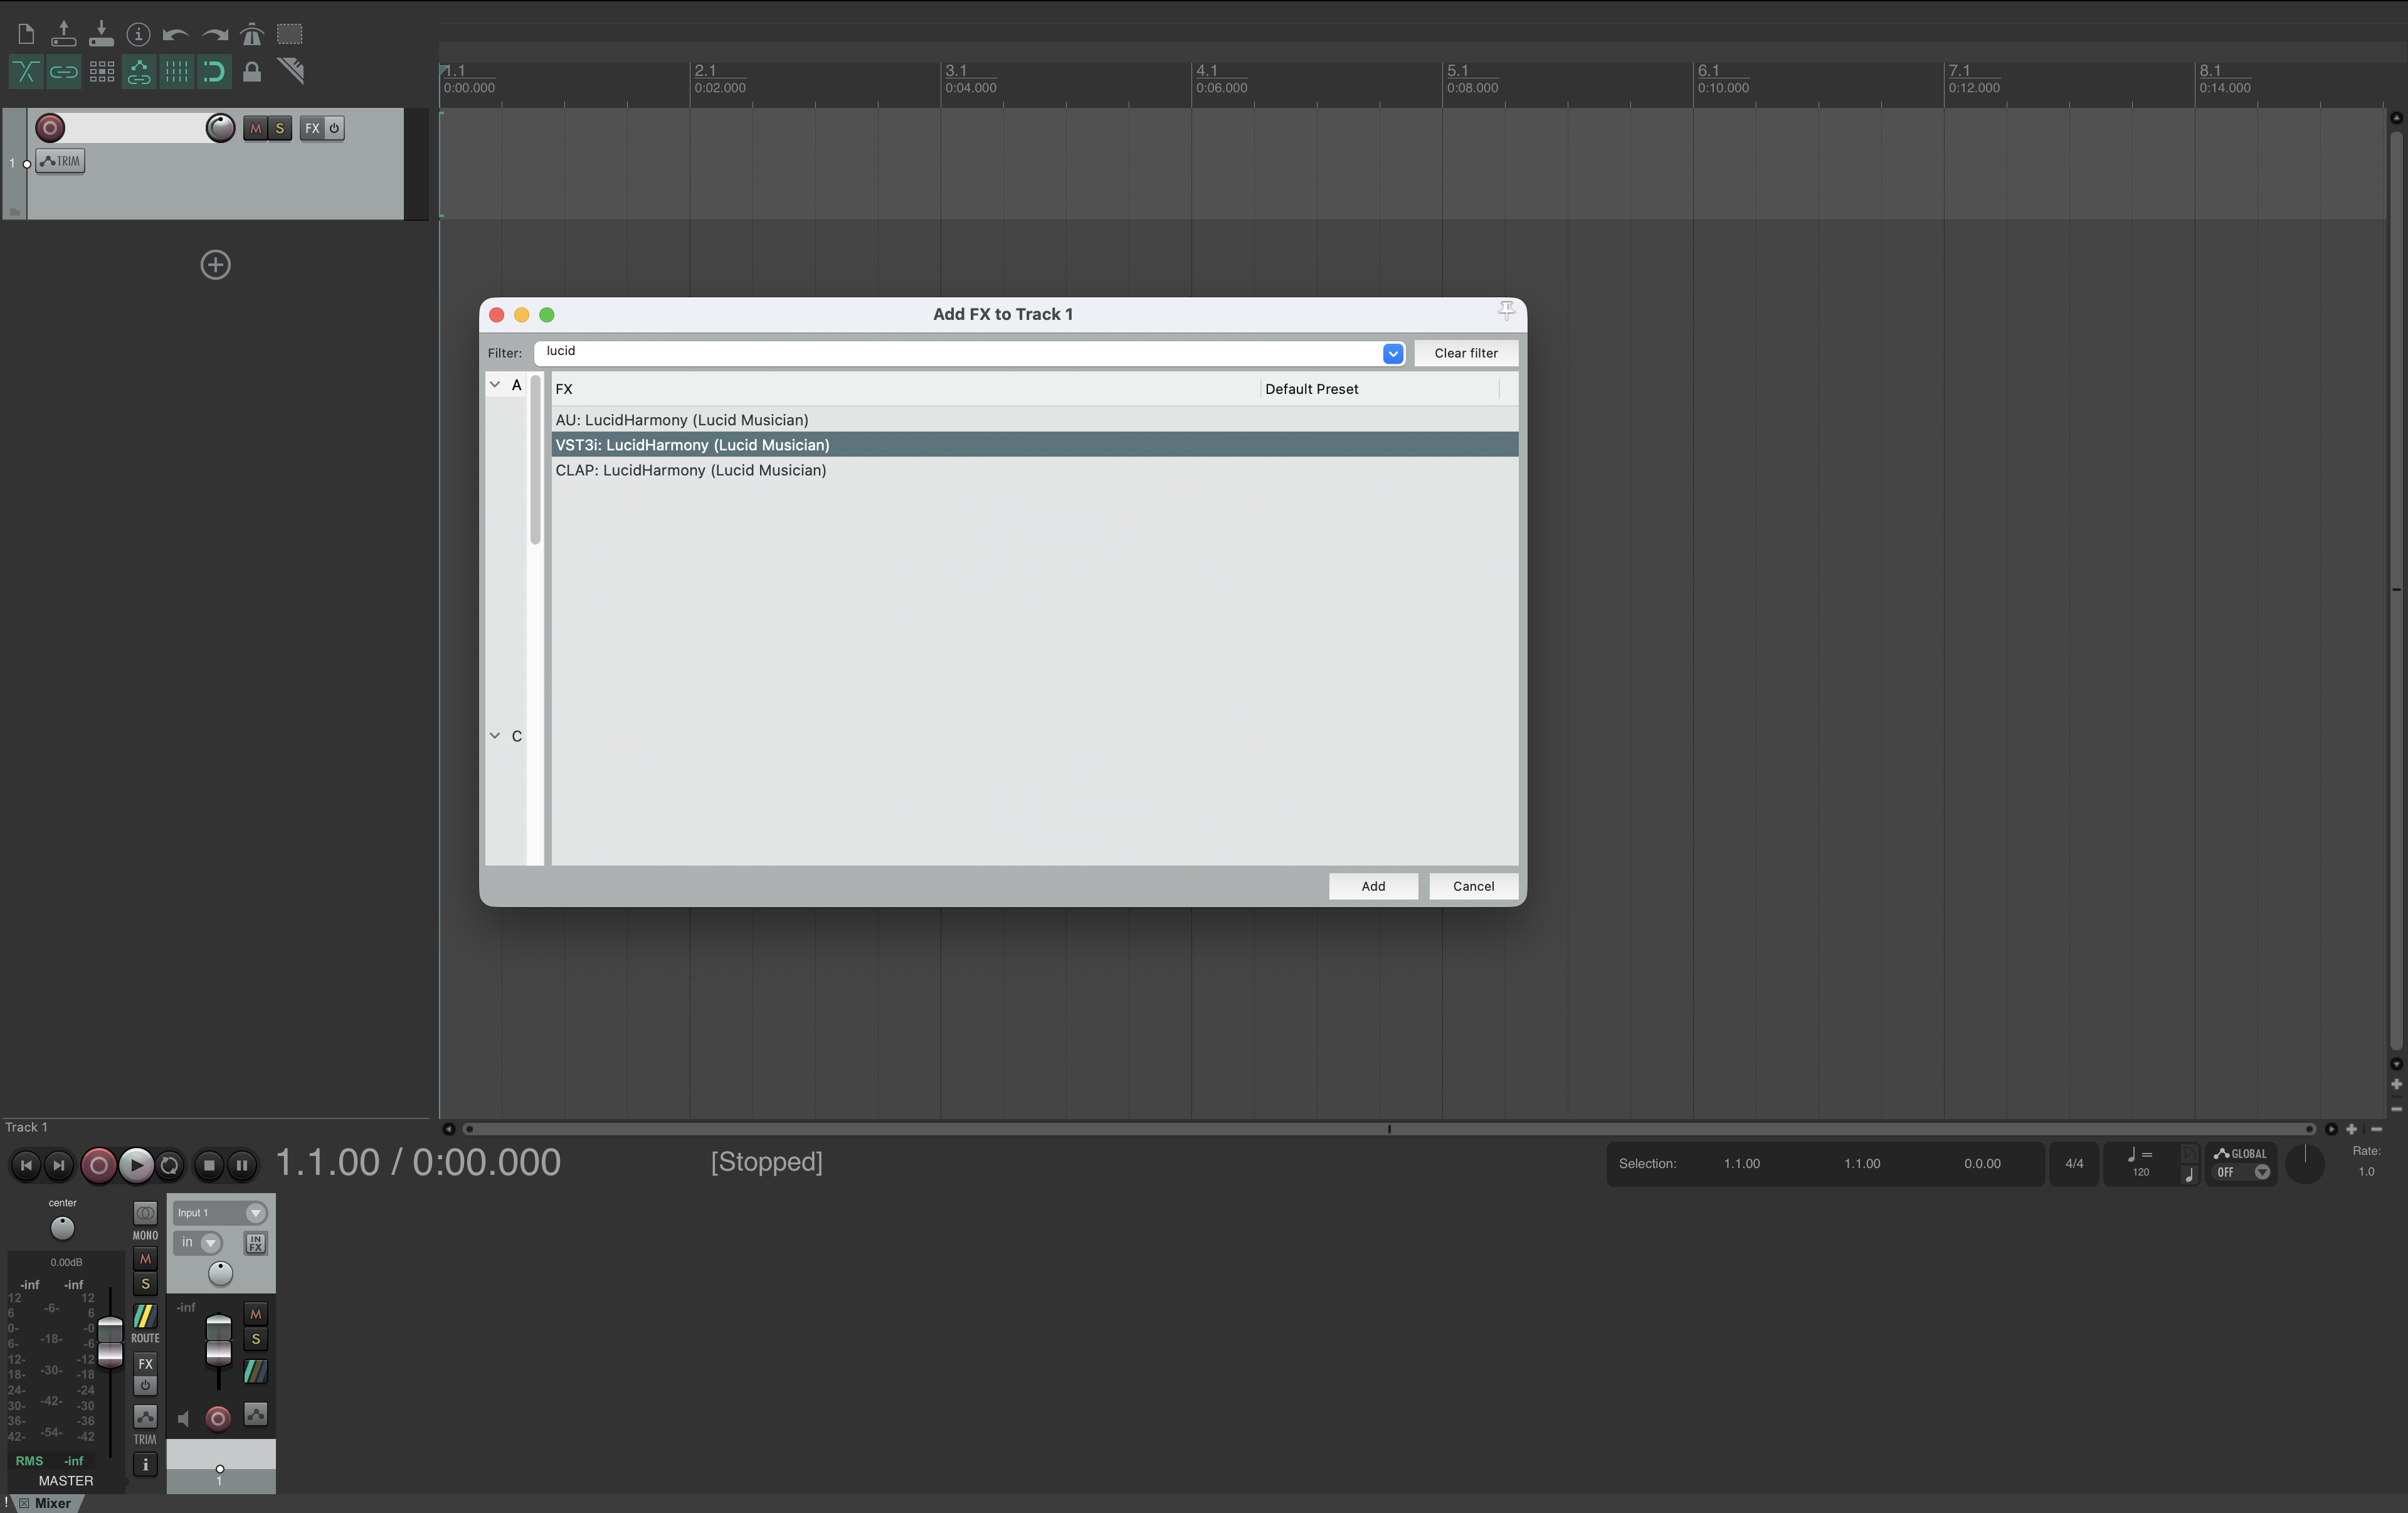
Why this works: Reaper’s routing matrix lets you send MIDI from any track to any other track. The LucidHarmony track sends MIDI to the instrument track, which renders the audio.
Quick Tips for All DAWs
- Use the right instrument: LucidHarmony generates 4-part harmony, so choir, pad, piano, and string sounds work particularly well
- Monitor settings: Make sure your instrument track is set to monitor input so you hear the MIDI as it’s generated
- Recording: You can record the MIDI output from LucidHarmony directly into your DAW for further editing
- Multiple instances: You can run multiple instances of LucidHarmony, each feeding different instruments for layered textures
Getting Started: Your First Chord Progression
LucidHarmony’s AI does the heavy lifting — you just need to set a few simple parameters and click Generate. No music theory knowledge required.
Step 1: Set Your Key and Start Chord
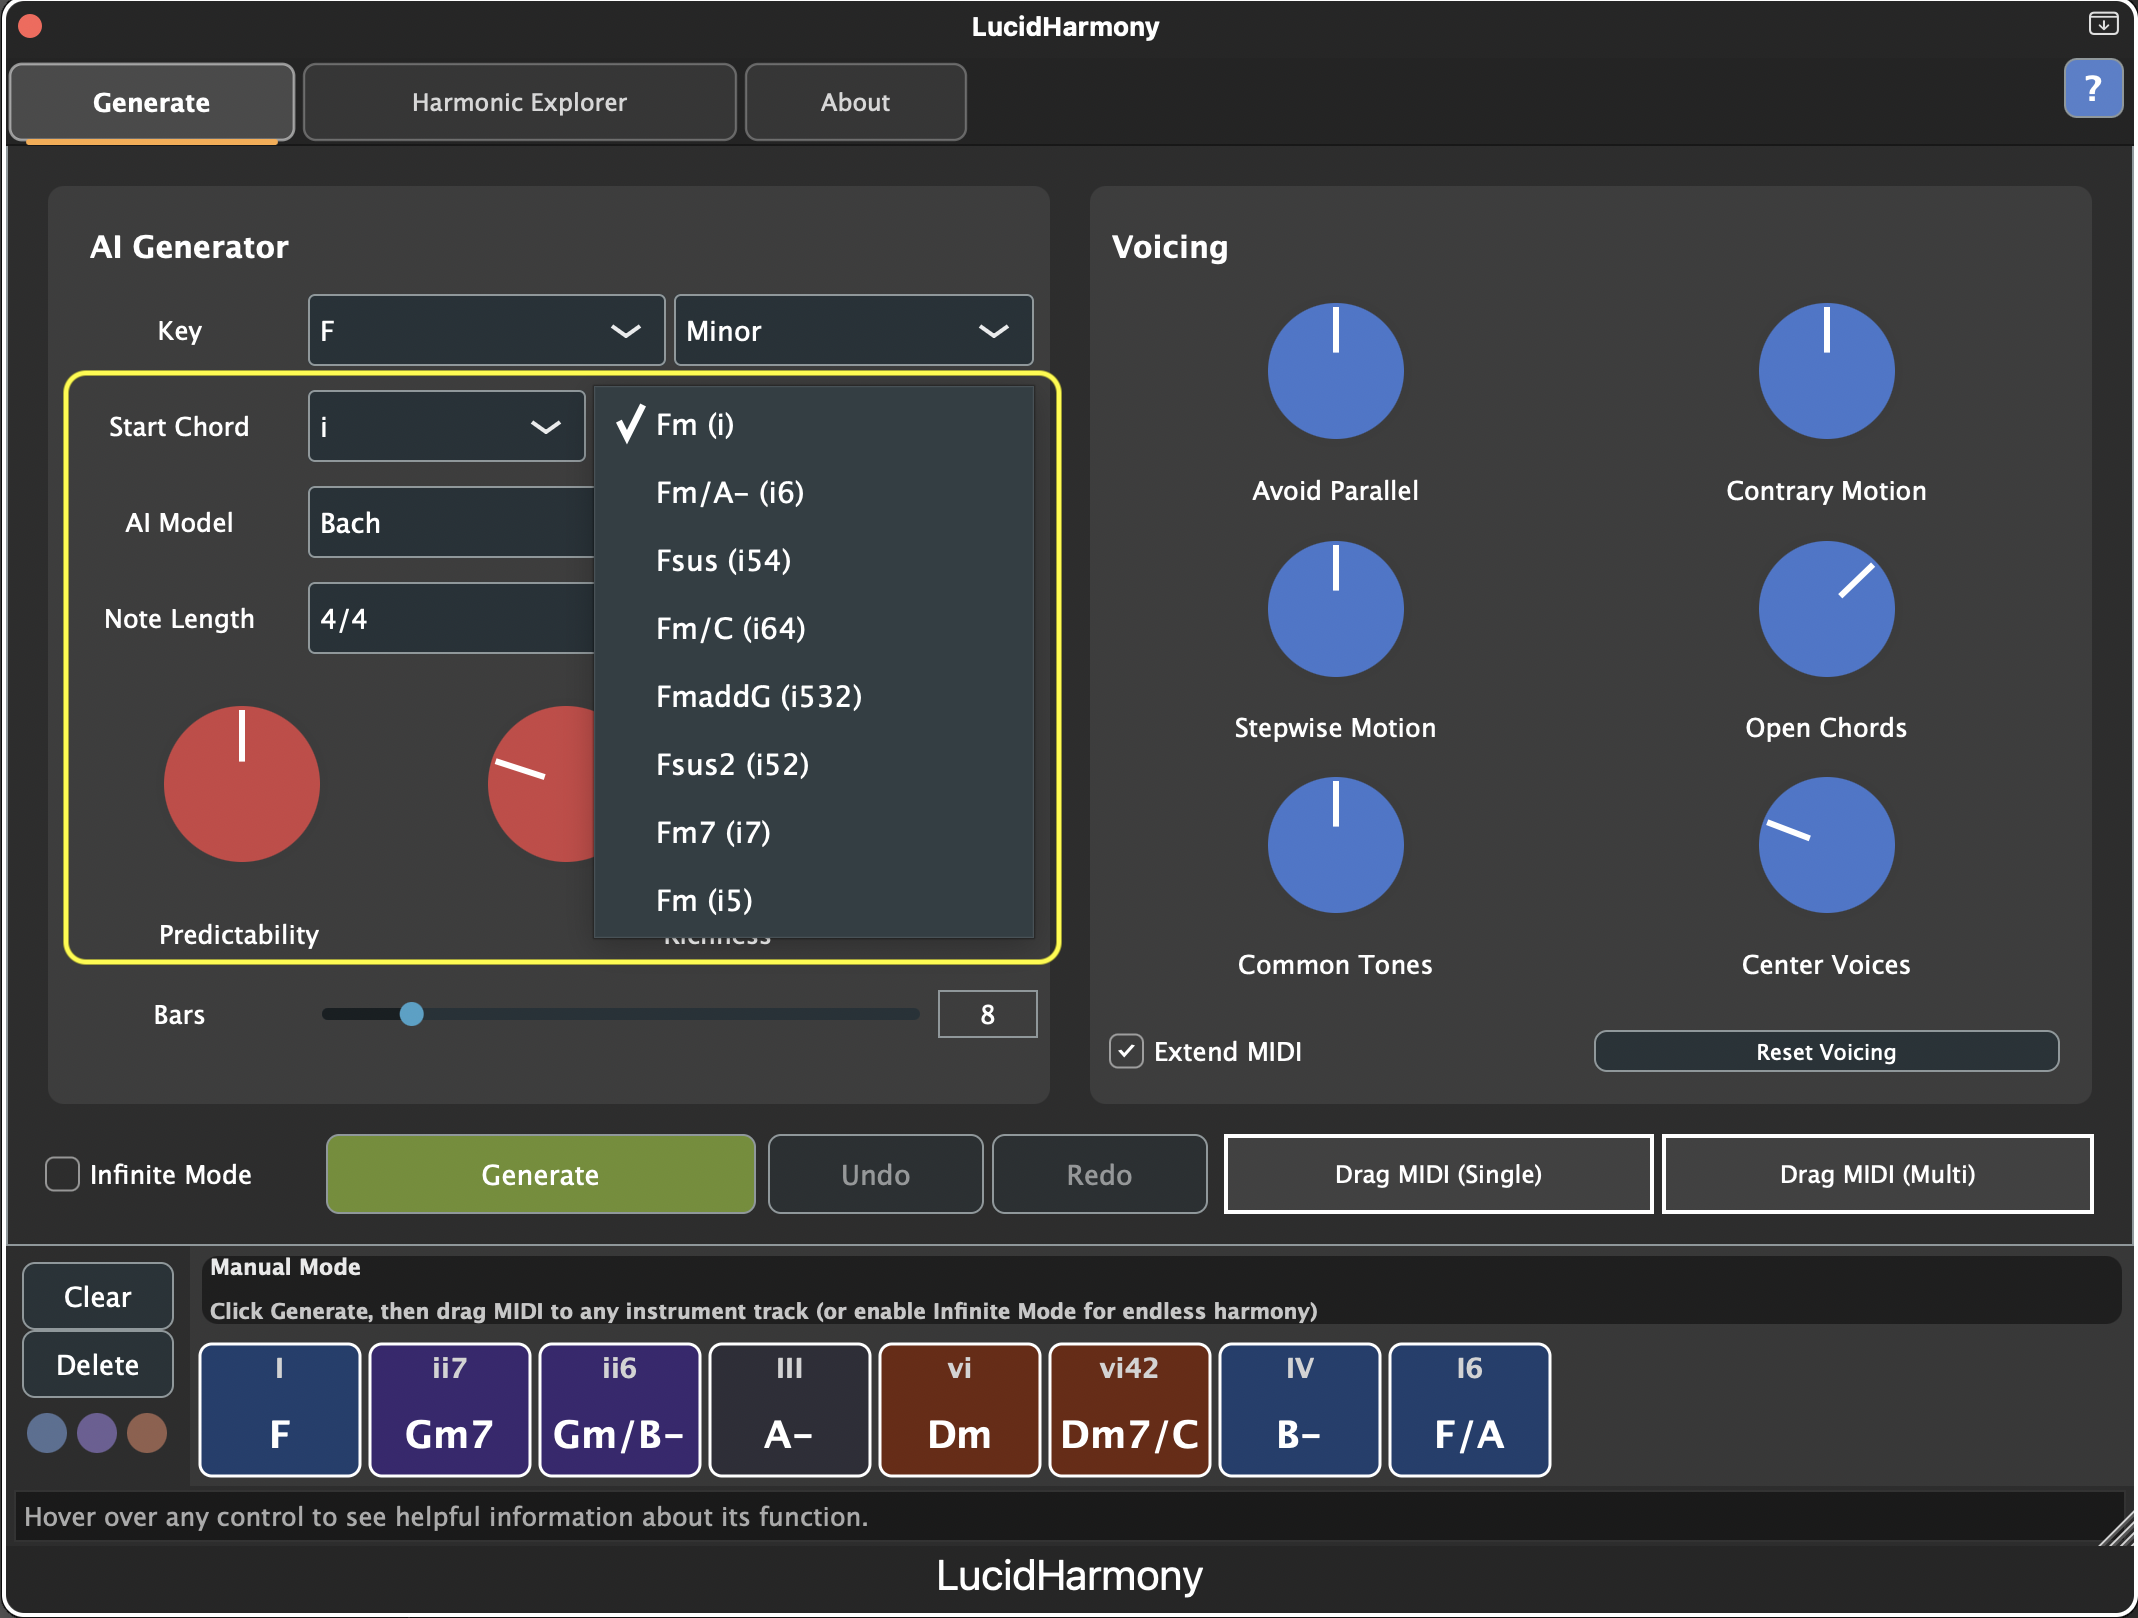
The key determines the tonal center of your progression. Start with something familiar:
- Key: Select a key from the dropdown and major/minor
- Start Chord: Choose where your progression begins in two parts. First, select the Roman numeral (I–VII in major, i–vii in minor). Then choose a Variant from the dropdown, which combines inversions and extensions (e.g., root position, 1st inversion, 7th, maj7, dim, aug, sus4, add9). The Variant list updates dynamically based on the selected AI model’s vocabulary — different models know different chord types. Experiment with this to discover where different chords can lead.
Why this matters: The key ensures all generated chords work together harmonically. You can’t go wrong — any key will produce musical results.
Step 2: Configure Generation Settings
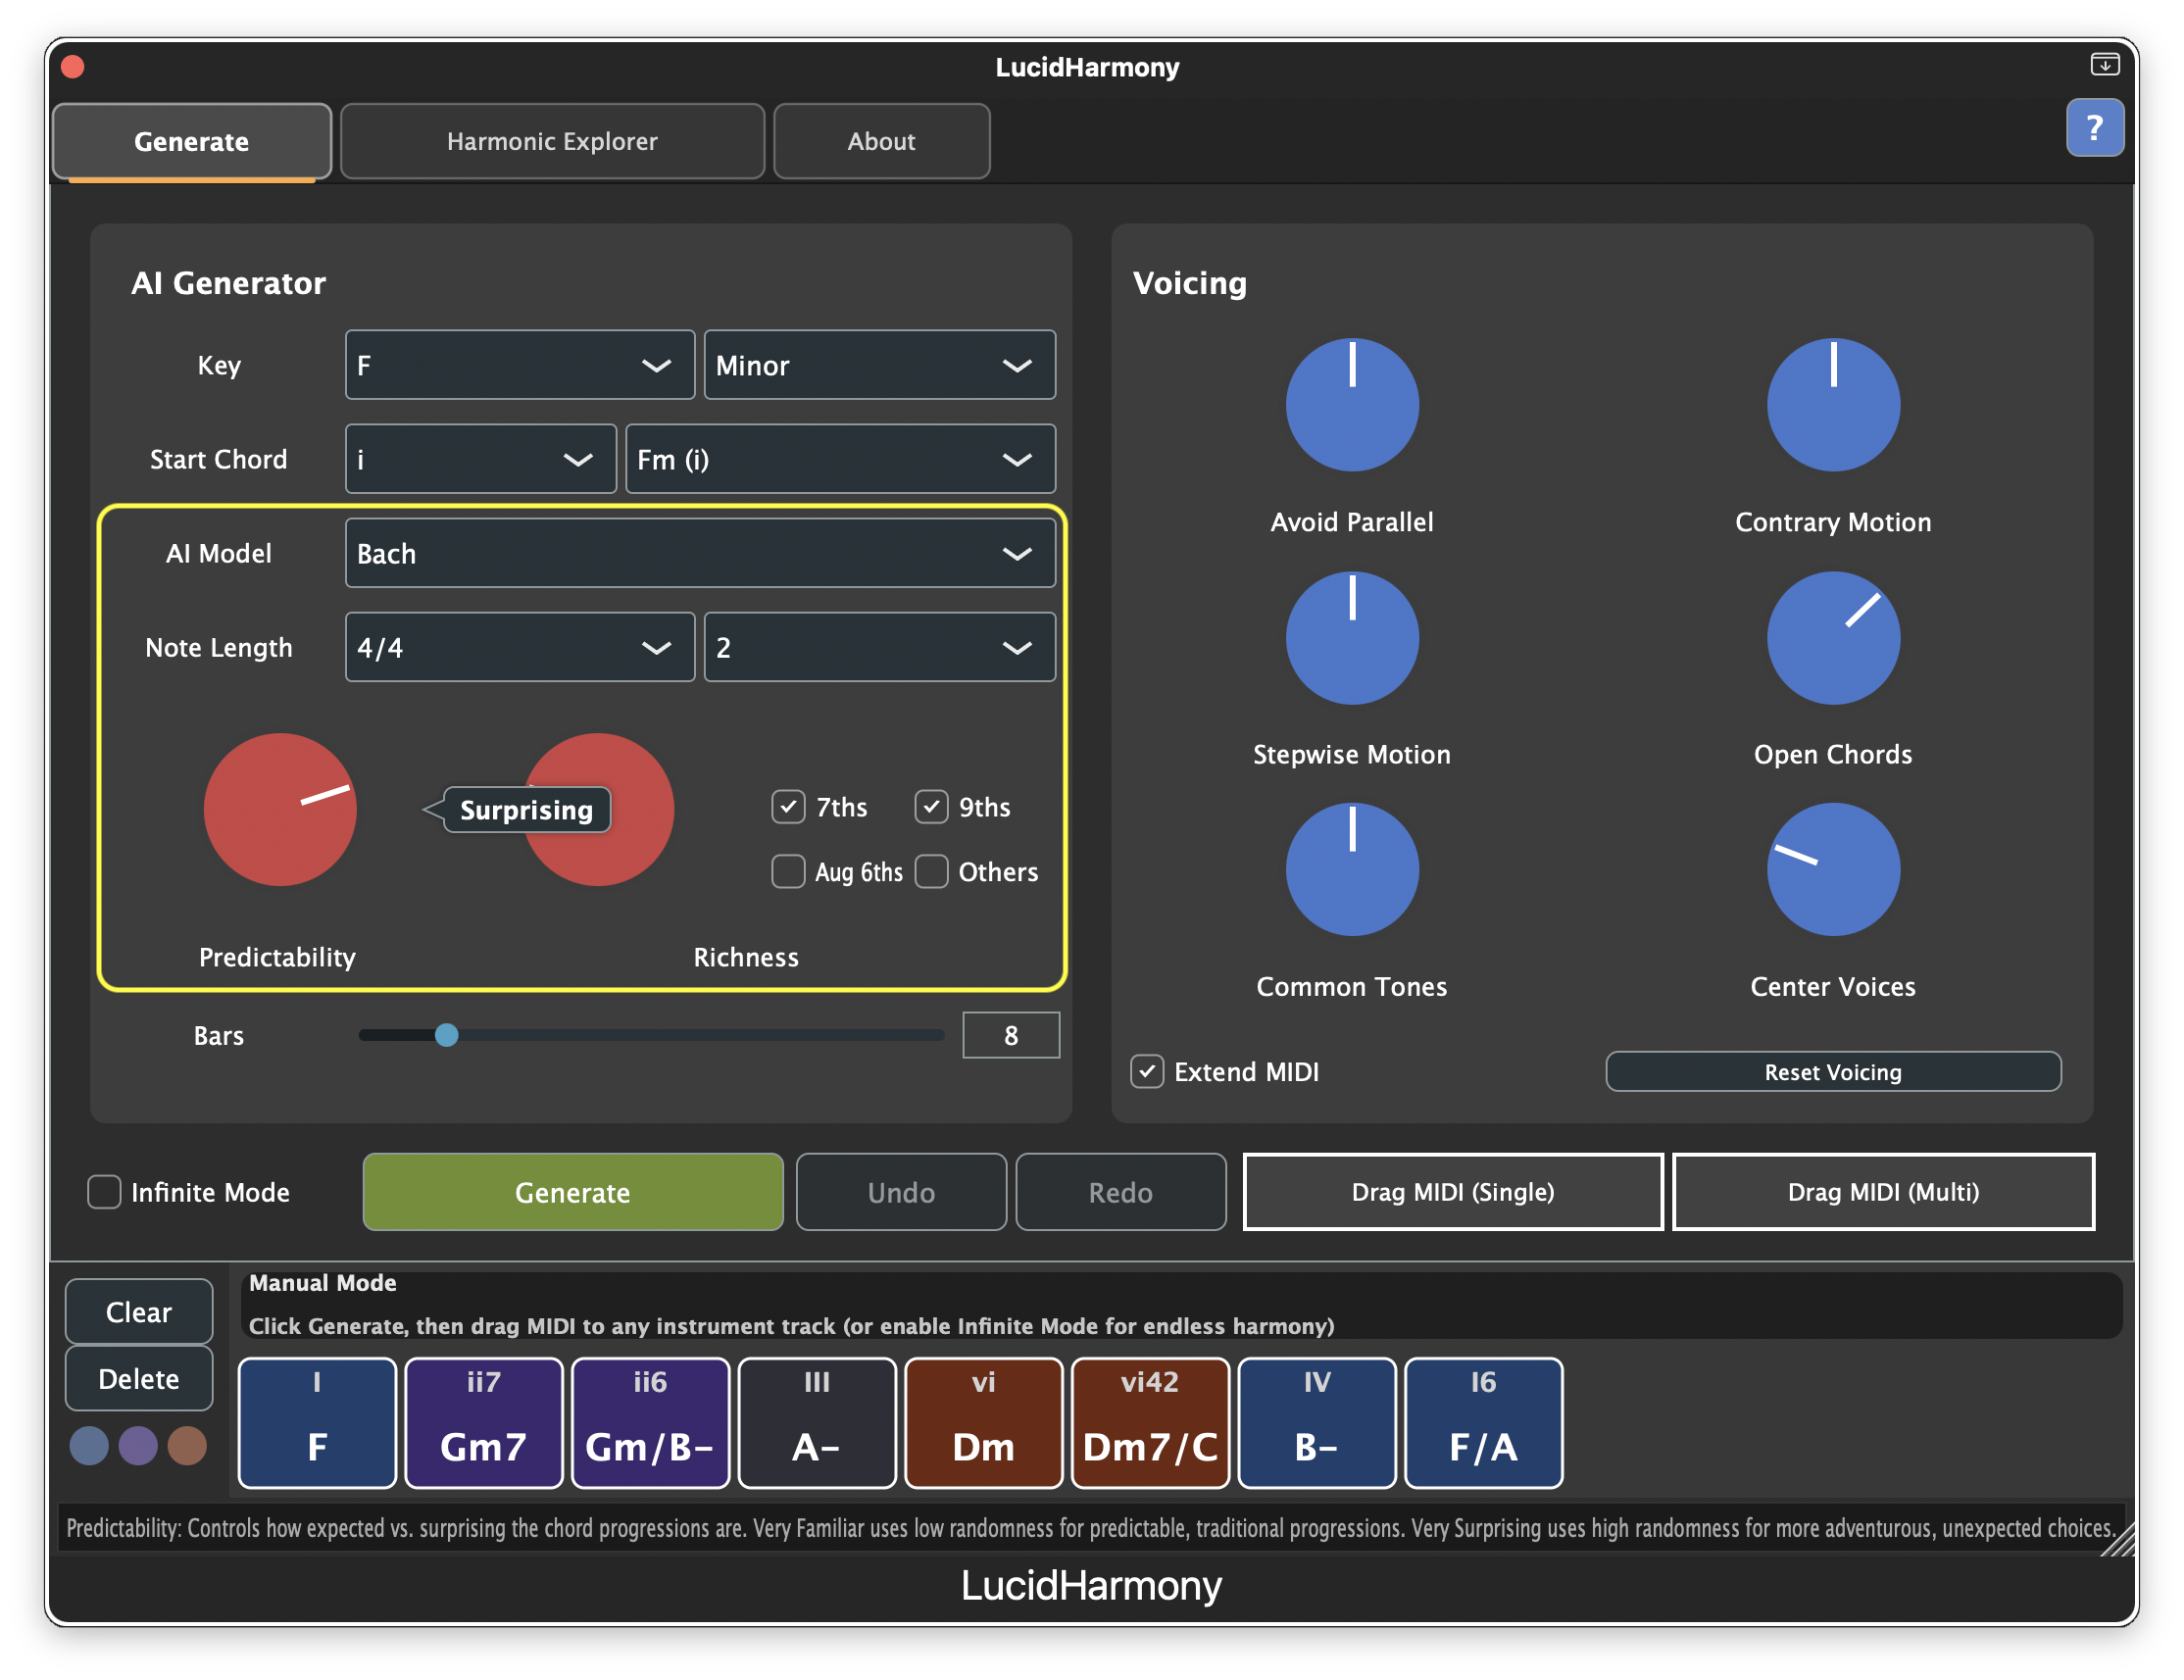
-
AI Model: Select from our collection of harmonic models trained on master composers
- Bach: The gold standard four-part harmony with strong voice leading and functional progressions. Perfect for structured, balanced progressions with strong tonal direction
- Corelli: Clear tonal progressions with elegant sequences. Ideal for flowing, lyrical progressions with refined cadential patterns
- Monteverdi: Expressive chromaticism and dramatic harmonic shifts between major and minor. Creates dramatic, emotionally charged progressions with bold harmonic shifts
- Palestrina: Smooth modal counterpoint with gentle dissonance and flowing lines. Generates serene, timeless progressions with modal flavor
- Trecento: Medieval sonorities with parallel motion and archaic cadences. Perfect for ancient, ethereal atmospheres with distinctive period character
-
Time Signature: Set the meter for your progression (default 4/4). Options include 4/4, 3/4, 2/4, 6/8, 12/8, 5/4, and 7/8. This affects how the generated MIDI is rhythmically organized in your DAW.
-
Note Length: How many bars each chord lasts (options: 1/8, 1/4, 1/2, 1, 2, 4, 8, 16). Try 1 bar at 120 BPM for quick changes like cinematic strings, or 4–8 for ambient at 80 BPM.
-
Predictability: Controls how surprising or familiar the progression feels
- Very Familiar: Safe, expected chord movements
- Familiar: Mostly expected with occasional interest
- Balanced: Mix of familiar and interesting (recommended for first use)
- Surprising: Adventurous, less predictable progressions
- Very Surprising: Highly adventurous, unexpected progressions
-
Harmonic Richness: Controls chord complexity
- Simple: Basic triads only
- Some Color: Occasional extensions
- Colorful: Some common extension
- Rich: Frequent extended harmonies
- Very Rich: Complex, densely extended voicings
You can control which common extended chords you want to include with the toggles. Higher richness settings bias the selected extended chords.
-
Bars: Start with 8 bars (you can always generate more later), or jump straight to infinite mode for endless chords.
Pro tip: Start with Balanced predictability and Colorful richness. You can always regenerate with different settings as many times as you like.
Step 3: Generate Your First Progression
Click the Generate button and watch the magic happen!
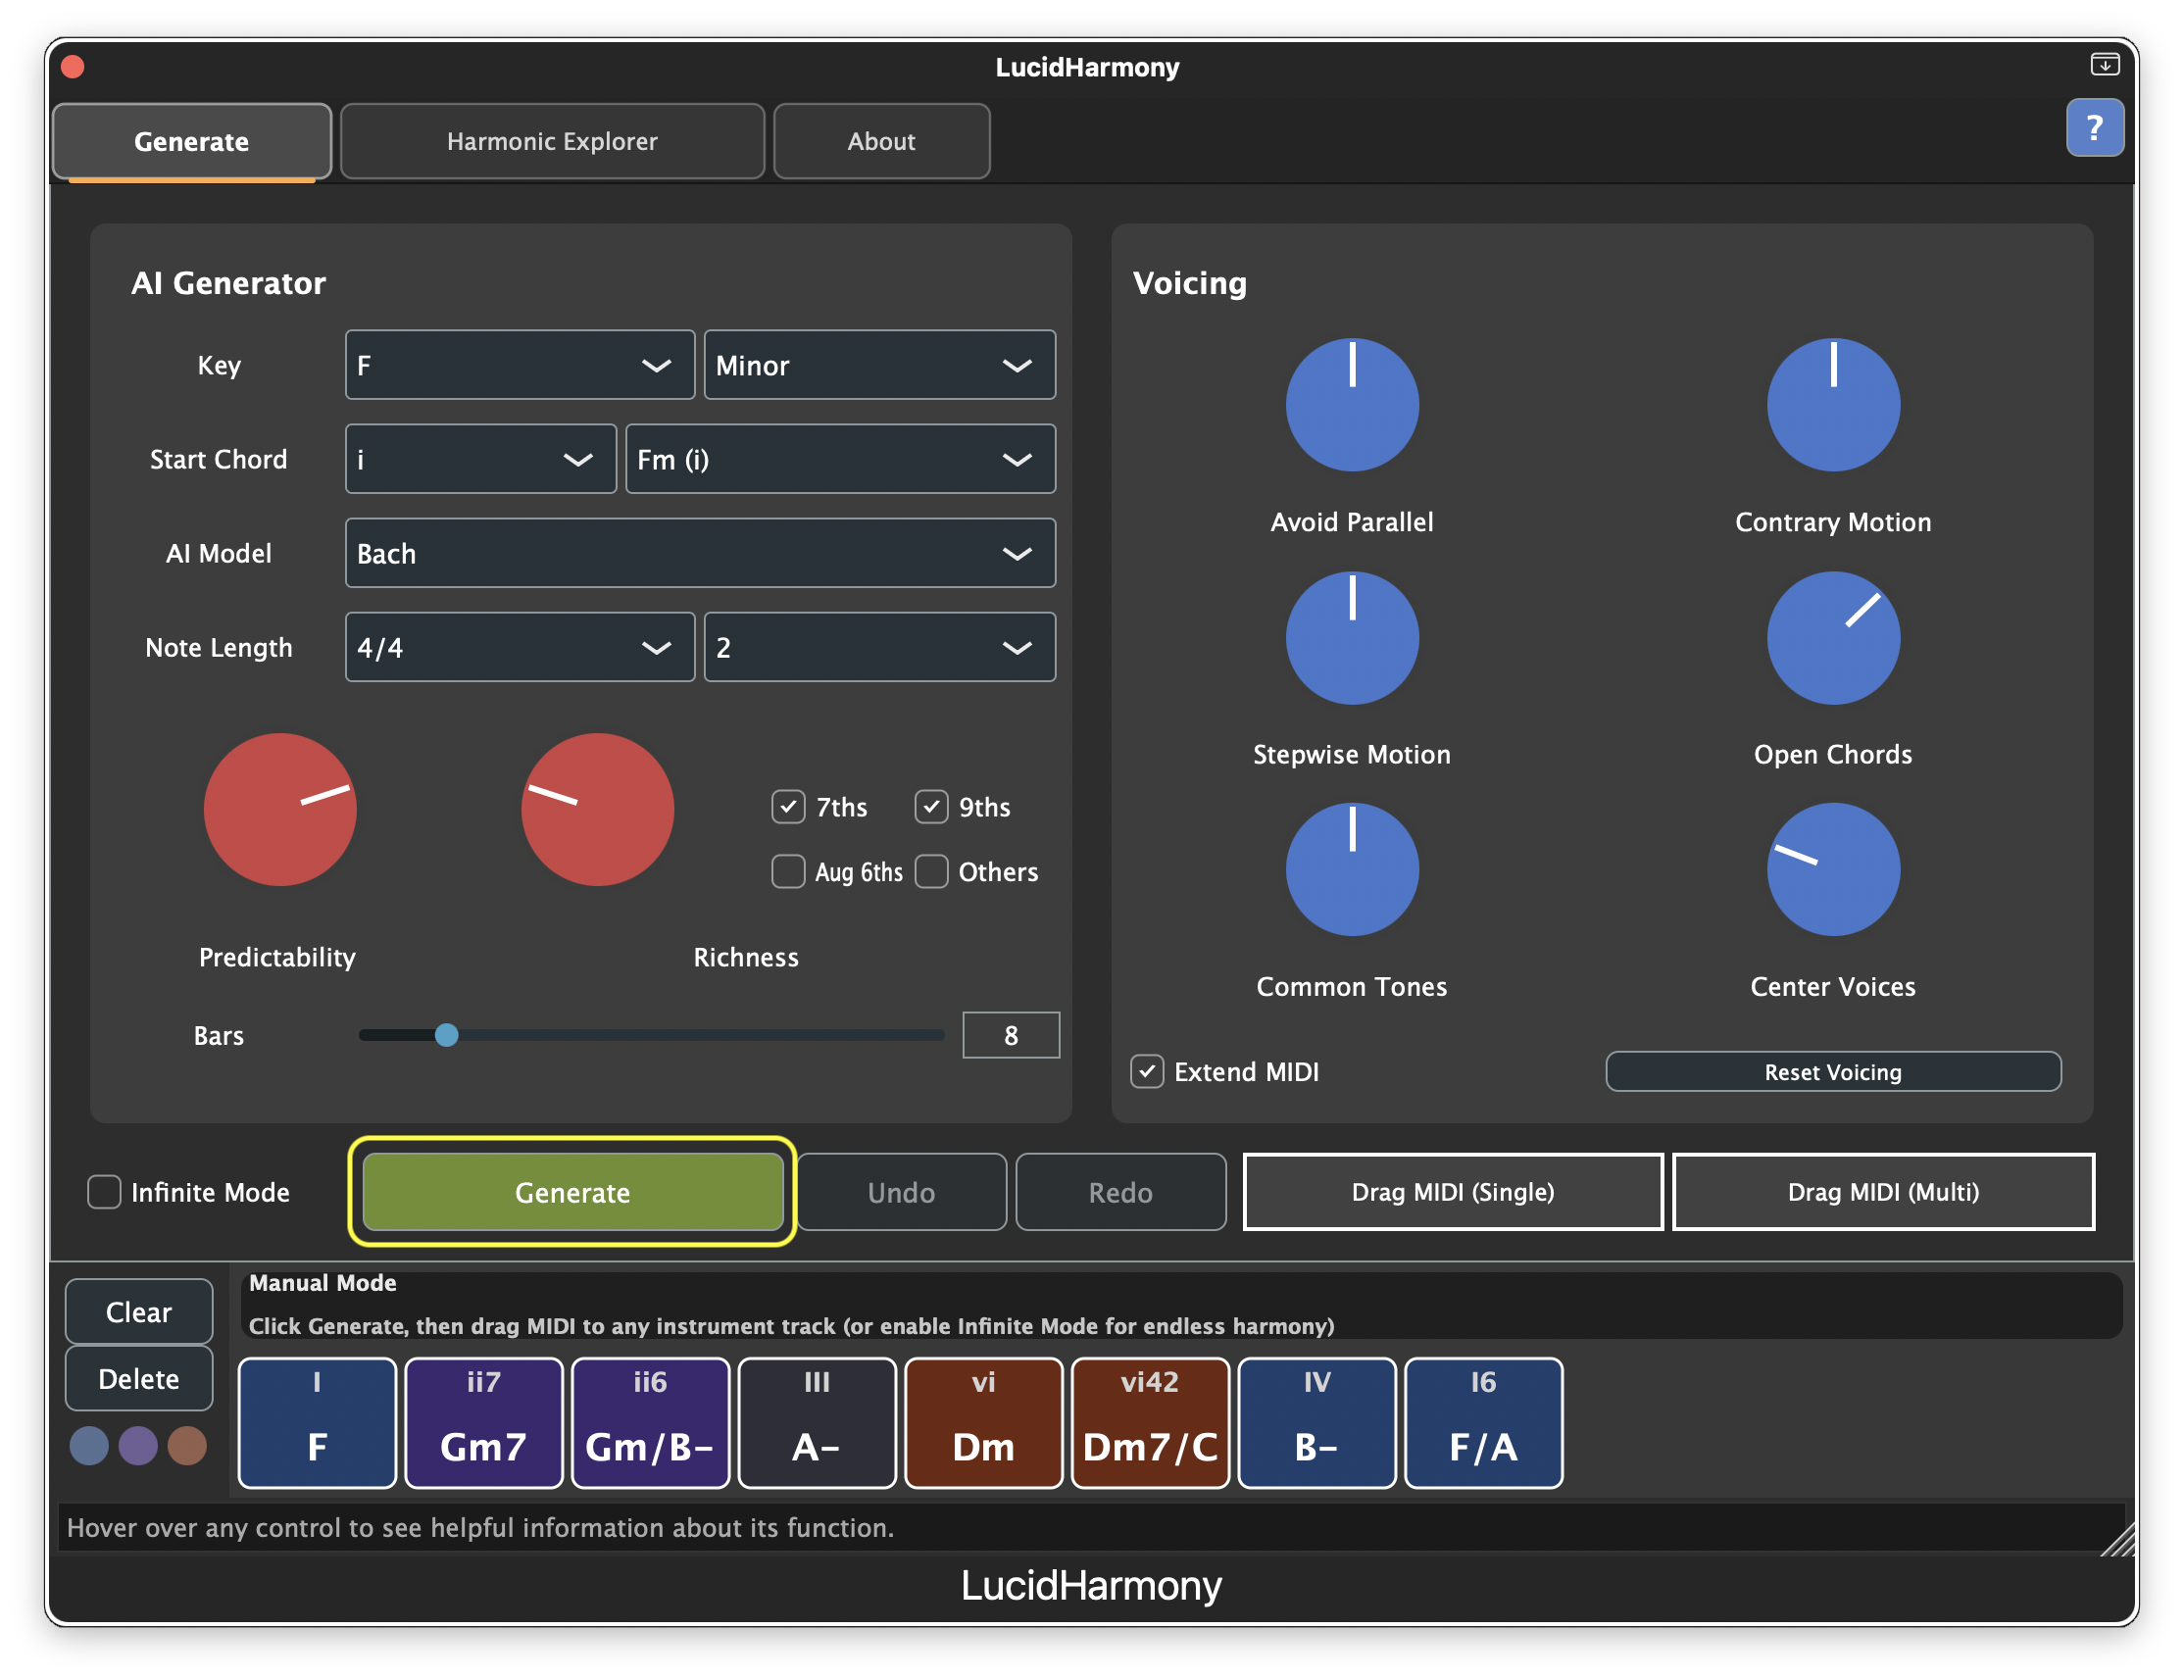
What you’ll see: Chord names in Roman numeral notation (I, IV, V, etc.), chord symbols in your chosen key (C, F, G, etc.), and a visual representation of the progression.
Don’t like it? Click Generate again! Each click produces a completely new progression. The AI draws from billions of possible combinations.
Step 4: Listen to Your Progression
Press play in your DAW or use LucidHarmony’s built-in playback. The current chord is highlighted as it plays. You’ll hear 4-part harmony with intelligent voice leading, and the default voicing provides a balanced, musical sound.
Step 5: Export to Your Instrument Track
Drag the MIDI directly into your DAW:
- Drag MIDI (Single): All 4 voices on one track — perfect for:
- Choir sounds
- Pad synths
- Piano
- String sections
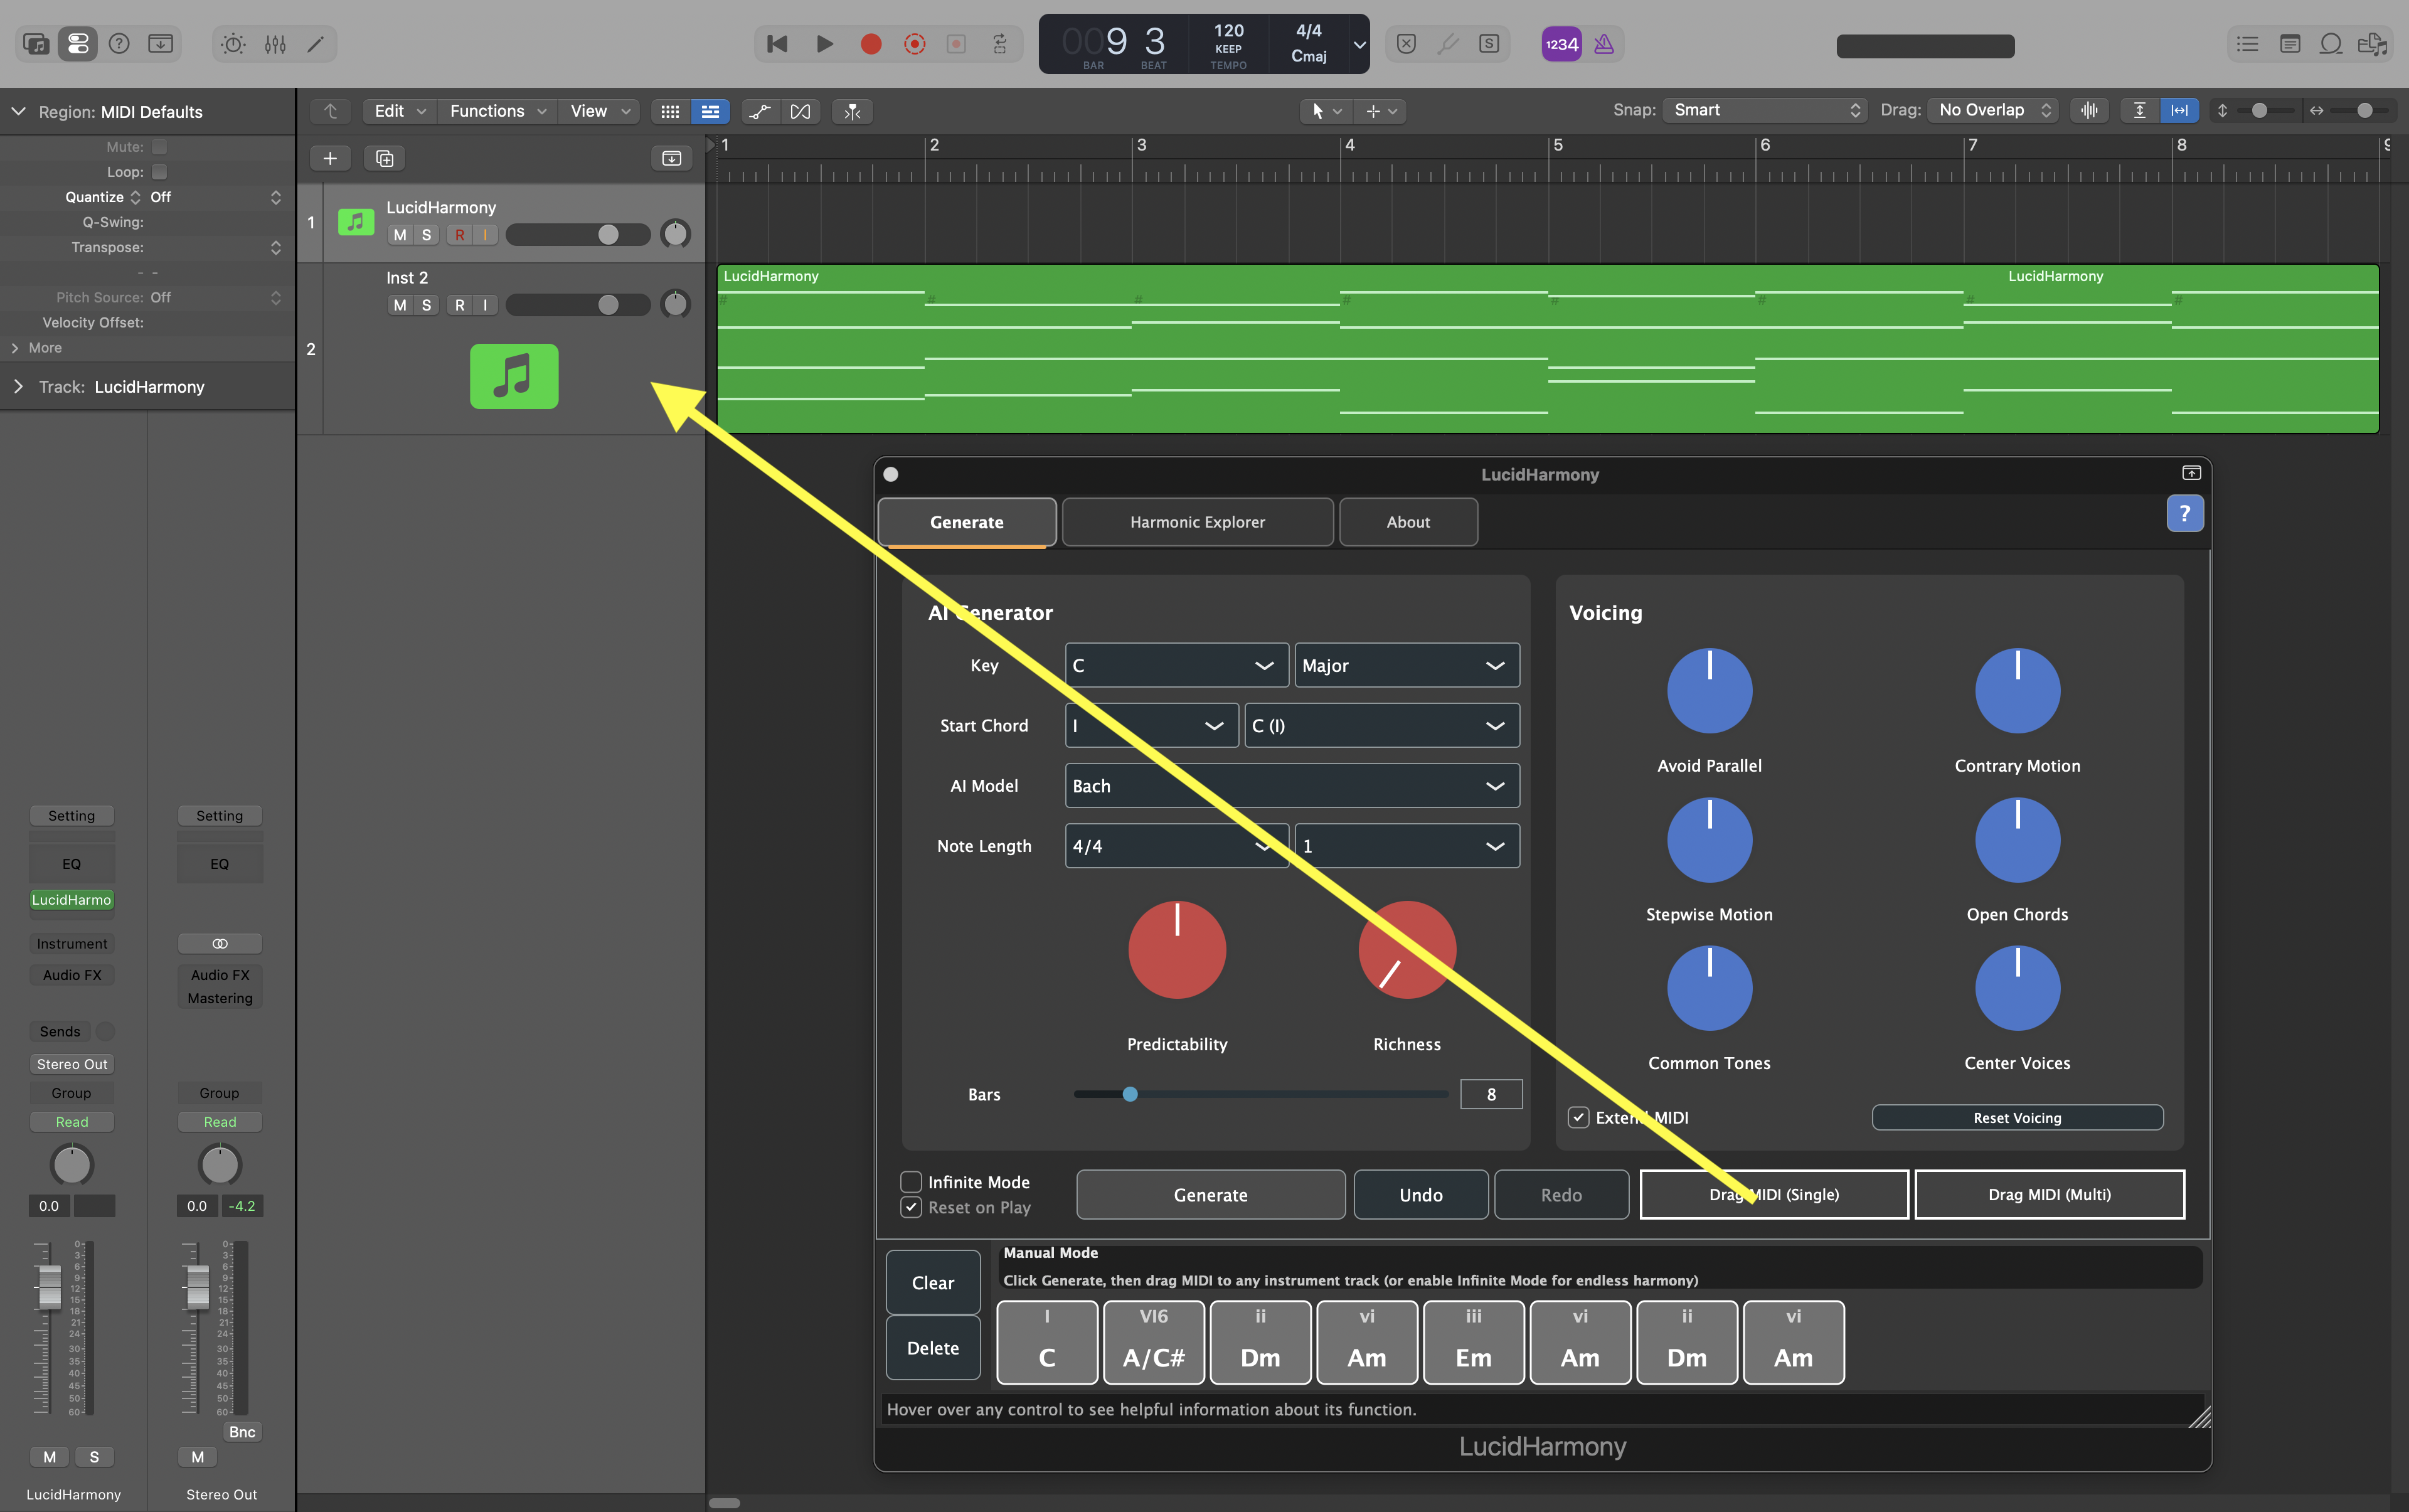
- Drag MIDI (Multi): Each voice on a separate track — ideal for:
- Independent instrument assignments
- Bass + melody + harmony splits
- Advanced mixing and processing
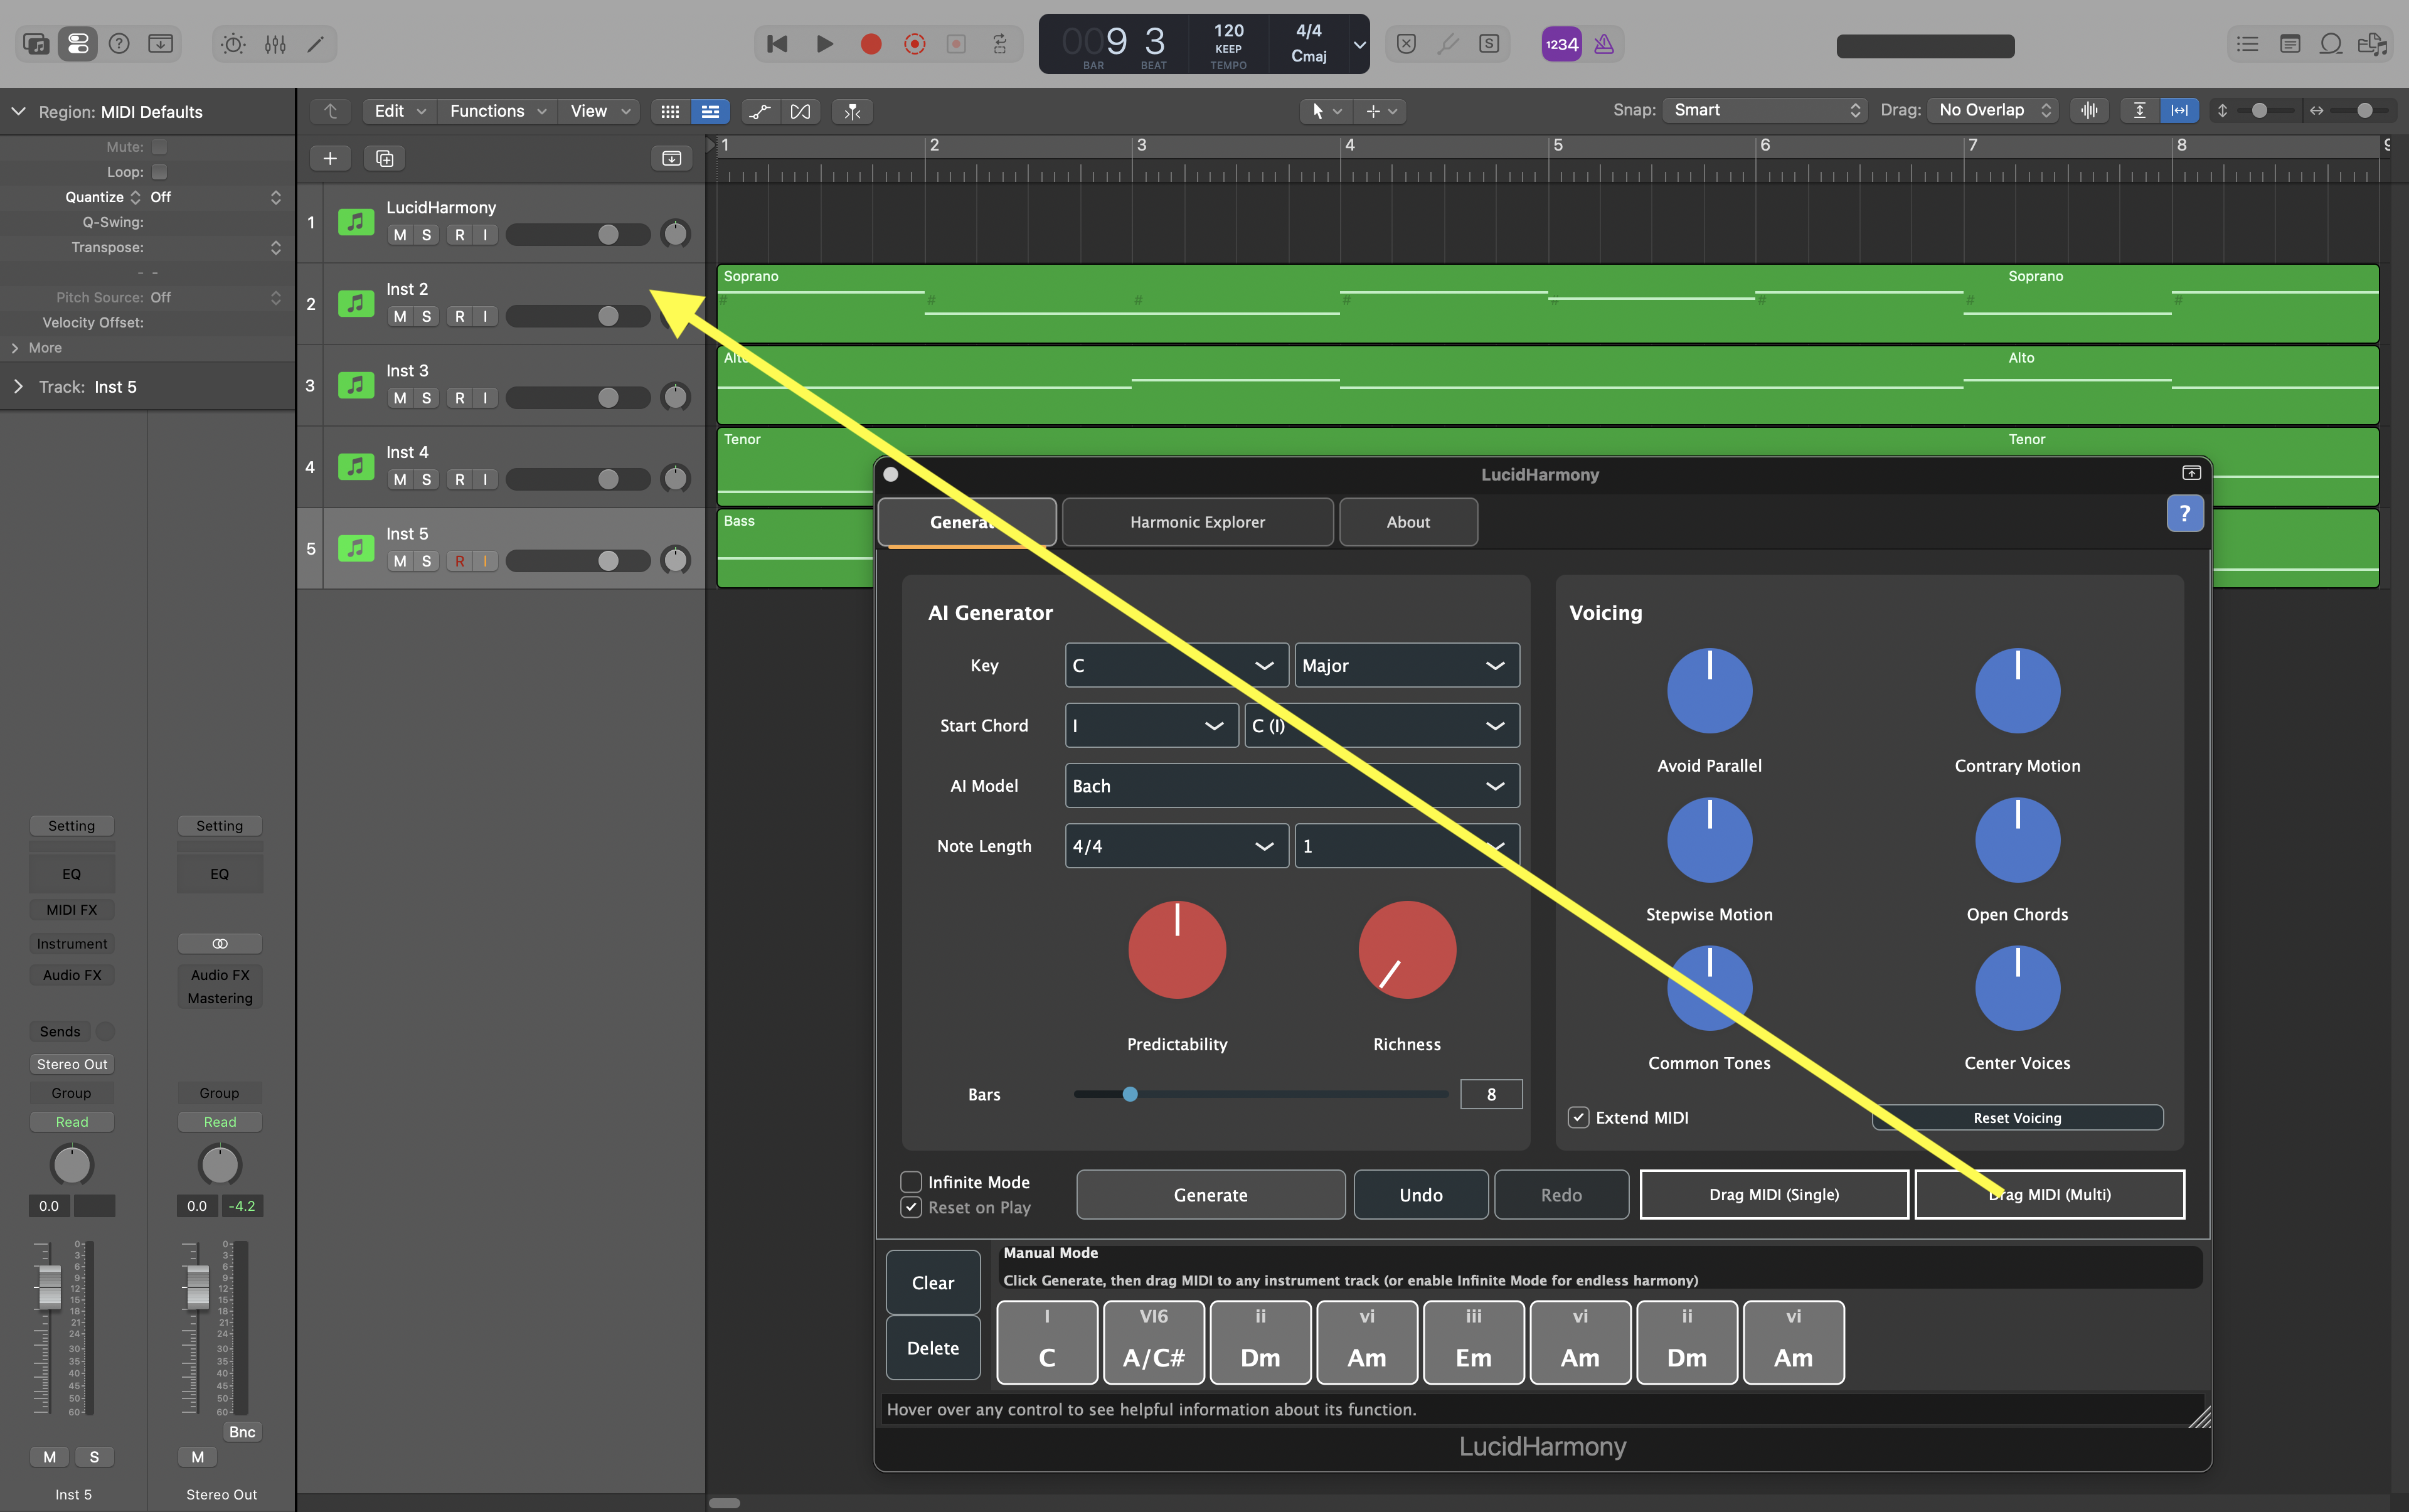
Tip: The exported MIDI includes chord symbol markers at each chord change, visible as text markers in DAWs that support them.
Infinite Mode
Infinite Mode is designed for creating very long MIDI sequences — perfect for ambient music, evolving soundscapes, or background harmony that plays while you work on other parts of your track.
How It Works
When you enable Infinite Mode, LucidHarmony generates continuously evolving chord progressions. You can use it in two ways:
1. Generate Long Sequences
Click Generate with Infinite Mode enabled to create extended progressions. Each generation recreates the entire sequence with fresh harmonic content. Don’t worry about regenerating multiple times — LucidHarmony’s custom AI is extremely fast: creating 100 chords takes about 1/10th of a second.
2. Live Background Harmony
Add LucidHarmony to an instrument track in your DAW and enable Infinite Mode with “Reset on Play.” Now when you press play, it generates new harmonic MIDI sequences in real-time while you work on other elements of your production.
Best Use Cases
- Ambient pads with long, sustained chords (try 4-8 bar note lengths)
- Evolving soundscapes that change gradually over time
- Background harmony that plays while you focus on melody or rhythm
- Exploration and discovery—let it run and capture interesting moments
Pro tip: Infinite Mode works beautifully with high Common Tones and Stepwise Motion settings for smooth, meditative progressions. Or go the opposite direction with low Common Tones and high Contrary Motion for more adventurous, shifting harmonies.
Undo/Redo
LucidHarmony maintains a complete history of up to 100 undo steps, saving both your chord progressions and all configuration settings. This means you can freely experiment with different generations, voicing parameters, and settings — then step backward through your entire creative process.
How to use:
- Undo: Cmd+Z (Mac) / Ctrl+Z (Windows) or click the Undo button
- Redo: Cmd+Shift+Z (Mac) / Ctrl+Shift+Z (Windows) or click the Redo button
Each undo step captures everything: the generated chords, key, AI model, predictability, richness, voicing settings, and more. You can compare different generations side-by-side by undoing and redoing, or recover a progression you accidentally regenerated over.
Pro tip: Generate 5-10 progressions in a row, then use undo to step back through them and pick your favorite. It’s faster than trying to remember which one you liked best.
Understanding the Interface
Main Tabs
LucidHarmony has three main tabs: AI Generator for creating progressions automatically, Chord Editor for manually editing individual chords and exploring alternatives, and About for version info, licensing, and settings.
The Two-Stage Workflow
LucidHarmony separates generation from voicing—a powerful approach that gives you maximum control:
Stage 1: Generate the Progression — Focus on harmonic content (which chords, in what order). The AI handles music theory and progression logic. Experiment freely — generation is instant.
Stage 2: Voice the Chords — Transform the same progression into different textures. Adjust voice leading, spacing, and range. One progression, infinite sonic possibilities.
Why this matters: You can find the perfect chord progression, then voice it 10 different ways for different sections of your track. Or use the same voicing settings across multiple progressions for consistency.
Harmonic Function Color Legend
The chord display uses color-coding to indicate each chord’s harmonic function:
- 🔵 Tonic (blue): Stable, restful chords — I, vi, iii
- 🟣 Predominant (purple): Approach chords that build momentum — ii, IV, ♭VII
- 🔴 Dominant (amber-red): Tension chords that resolve to tonic — V, vii°
This color scheme helps you visually identify the harmonic rhythm and tension-resolution patterns in your progressions at a glance. Hover over the colored dots in the legend bar for tooltips.
The color saturation reflects chord complexity: simple triads appear more muted, while extended chords (7ths, 9ths, augmented 6ths) appear more vivid. Borrowed or chromatic chords have a slightly different lightness to help them stand out.
Rich Chord Tooltips
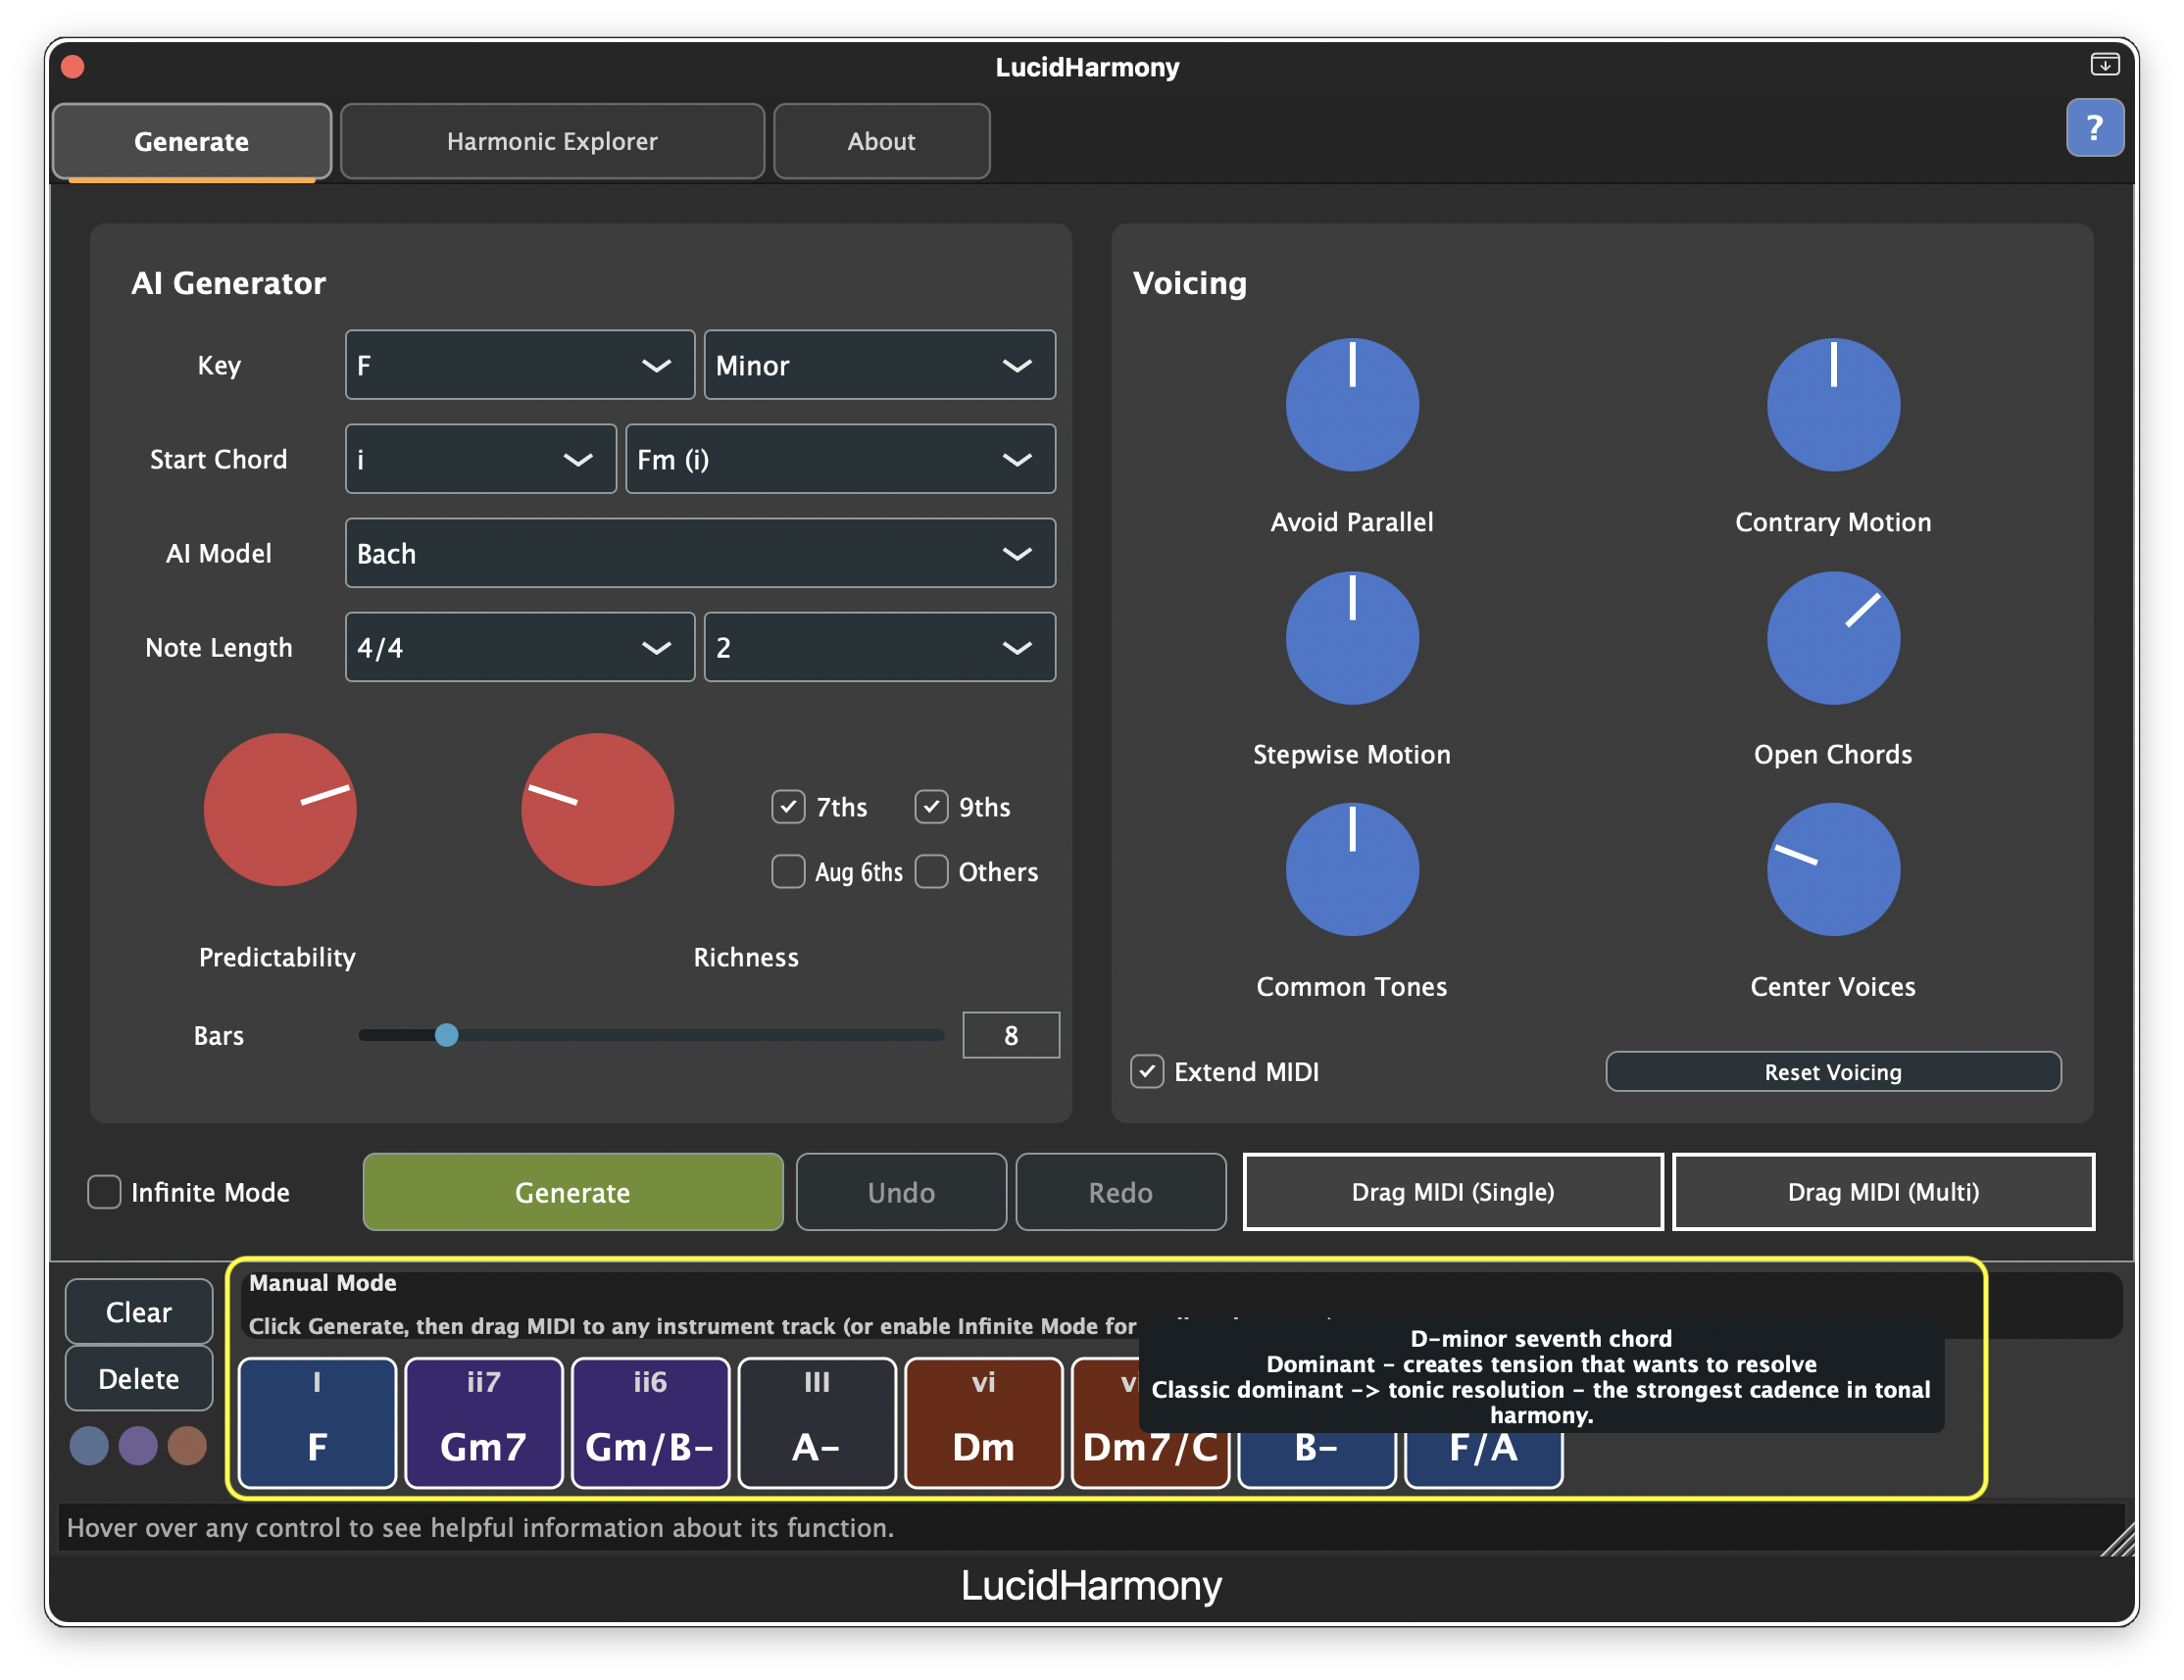
Hover over any chord in the tape to see detailed information:
- Harmonic role: Tonic, Predominant, Dominant, or Chromatic
- Modifier tags: Secondary, borrowed, chromatic, augmented 6th, seventh, ninth, Neapolitan
- Contextual description: How the chord relates to its neighbors (e.g., “Classic dominant to tonic resolution”)
These tooltips help you understand the harmonic function of each chord without needing to know music theory. They also appear in the Harmonic Explorer when hovering over chord bubbles.
Hover Help
LucidHarmony includes a contextual help panel that displays information about any control you hover over. Move your mouse over any knob, slider, button, or dropdown to see a brief description of what it does. This is a quick way to learn the interface without leaving the plugin.
Music Theory Primer
You don’t need to know music theory to use LucidHarmony — we’re hoping this plugin give you the freedom to delegate a lot of that to us — but understanding a few concepts will help you get more out of it. This section explains the terms you’ll see in the plugin and how they relate to the music you’re creating.
Keys and Modes
A key is the tonal home base of your music. It determines which notes and chords sound “right” together. LucidHarmony supports all 12 keys (C, C#, D, D#, E, F, F#, G, G#, A, A#, B) in two modes:
- Major: Bright, happy, resolved. Think of the sound of a simple C-E-G chord.
- Minor: Darker, more emotional, sometimes melancholy. Think of A-C-E.
The key and mode together define the palette of chords the AI draws from. Changing the key transposes everything but keeps the same harmonic relationships. Changing the mode transforms the character entirely.
Roman Numeral Notation
LucidHarmony displays chords as Roman numerals (I, ii, V, etc.) rather than note names (C, Dm, G). This is standard music theory notation that describes a chord’s role in the key, not its absolute pitch.
- I (Tonic) — Home base, stability. Example in C Major: C major
- ii (Supertonic) — Gentle motion, leads to V. Example in C Major: D minor
- iii (Mediant) — Soft color, related to I. Example in C Major: E minor
- IV (Subdominant) — Warmth, approach chord. Example in C Major: F major
- V (Dominant) — Tension, wants to resolve to I. Example in C Major: G major
- vi (Submediant) — Emotional, relative minor. Example in C Major: A minor
- vii° (Leading tone) — Strong pull toward I. Example in C Major: B diminished
Uppercase numerals (I, IV, V) indicate major chords. Lowercase (ii, iii, vi) indicate minor chords. This is why the same progression (say, I-IV-V-I) works in any key: the relationships stay the same.
Inversions and Extensions
Chords can be rearranged and extended:
- Inversions change which note is in the bass. A “I6” chord puts the third in the bass instead of the root, creating a lighter sound. “I64” puts the fifth in the bass.
- Seventh chords (V7, ii7) add a fourth note for richer color. These are the “7ths” toggle in the Richness section.
- Ninth chords add a fifth note for even more complexity.
- Augmented sixth chords (It6, Fr6, Ger6) are chromatic chords with a distinctive, intense sound used to approach cadences.
The Variant dropdown in the Start Chord selector shows all the inversions and extensions available for each Roman numeral in the current model’s vocabulary.
Harmonic Function
Every chord serves a role in the harmonic story. LucidHarmony groups chords into three main functions, shown by color in the chord tape:
- Tonic (blue): Rest and resolution. The “home” chords (I, vi, iii). Music feels settled here.
- Predominant (purple): Momentum and approach. These chords (ii, IV) build energy and lead toward tension.
- Dominant (amber-red): Tension and expectation. These chords (V, vii°) create a strong pull back to tonic.
A typical harmonic phrase moves: Tonic → Predominant → Dominant → Tonic. This tension-and-release cycle is the engine of Western harmony, and it’s what makes generated progressions feel musical rather than random.
Voice Leading
Voice leading is the art of moving individual notes smoothly from one chord to the next. Instead of jumping all four notes to new positions at each chord change, good voice leading keeps common tones, moves by small steps, and avoids awkward parallel motion.
LucidHarmony generates four voices (Soprano, Alto, Tenor, Bass) and applies voice-leading rules to connect them. The six voicing dials let you control how strictly these rules are applied. This is why the same chord progression can sound completely different with different voicing settings.
Cadences
A cadence is a harmonic punctuation mark at the end of a phrase. The most common types:
- Perfect cadence (V → I): The strongest ending, like a period at the end of a sentence.
- Plagal cadence (IV → I): The “Amen” cadence, softer and more hymn-like.
- Half cadence (* → V): An open ending, like a comma. The phrase pauses but doesn’t resolve.
- Deceptive cadence (V → vi): A surprise twist where the expected resolution is replaced.
You’ll hear these naturally in LucidHarmony’s output. The AI has learned cadential patterns from the training data, so phrases tend to end with satisfying harmonic resolutions.
How the AI Works
LucidHarmony’s AI is not a generic large language model. Each composer model is a purpose-built neural network trained exclusively on harmonic analysis data from that composer’s works.
Training Data
Each model is trained on chord progressions extracted from real compositions using computational musicology tools. The training data is Roman numeral analysis, not audio or MIDI. This means the AI learns harmonic relationships and tendencies, not melodies or rhythms.
- Bach — 371 chorale harmonizations (Riemenschneider collection) (632 chord types)
- Palestrina — Sacred vocal works and masses (717 chord types)
- Monteverdi — Madrigals and early opera (586 chord types)
- Corelli — Trio sonatas and concerti grossi (429 chord types)
- Trecento — 14th-century Italian secular music (Landini, etc.) (605 chord types)
The vocabulary size reflects the harmonic diversity of each composer’s style. Palestrina’s larger vocabulary comes from the rich modal language of Renaissance polyphony. Corelli’s smaller vocabulary reflects the more standardized tonal language of the High Baroque.
The Neural Network
Each model is a recurrent neural network (LSTM) that predicts the next chord given the preceding context. The architecture:
- Input: The current chord is converted to a numerical token
- Embedding: The token is mapped to a learned vector representation that captures harmonic meaning
- LSTM layers: Two stacked recurrent layers maintain a “memory” of the harmonic context, tracking patterns like key, mode, and recent chord function
- Output: A probability distribution over all possible next chords
When you click Generate, the model runs this prediction loop repeatedly: pick a chord, feed it back in, predict the next one, and so on. The Predictability dial controls how the model samples from its probability distribution. Lower values pick the most likely chords; higher values allow more surprising choices.
Two-Stage Pipeline
LucidHarmony separates chord generation from voicing into two independent stages:
Stage 1: Chord Generation — The AI model produces a sequence of Roman numeral tokens (e.g., I → IV → V → I). This is purely about harmonic content: which chords, in what order. The model has no concept of pitch, register, or voice assignment.
Stage 2: Voice Leading — A separate algorithm takes the Roman numeral sequence and realizes it as four-part SATB (Soprano, Alto, Tenor, Bass) MIDI. This stage uses a metadata-driven approach: a comprehensive database of chord-to-pitch-class mappings, inversion rules, and tendency resolutions guides the voicing engine. The six voicing dials control the heuristics used to connect chords smoothly.
This separation is what makes LucidHarmony flexible. You can generate one progression and voice it many different ways, or use the same voicing settings across different progressions for consistency.
The Richness and Predictability Controls
These two dials shape the AI’s output in complementary ways:
Predictability controls the sampling temperature. At “Very Familiar,” the model almost always picks its top prediction, producing conventional progressions. At “Very Surprising,” it samples more broadly from the probability distribution, allowing rare and unexpected chords.
Richness biases the model toward or away from extended chords. At “Simple,” the model favors basic triads. At “Very Rich,” it boosts the probability of seventh chords, ninth chords, and other extensions. The four toggles (7ths, 9ths, Aug 6ths, Others) let you choose which extension types to include.
Together, these controls let you navigate a space from “simple and predictable” (hymn-like) to “complex and surprising” (jazz-influenced or experimental).
Voicing Controls
Voicing transforms the feel of the harmony. You can tweak voicing heuristics independently to dial in more (or less) traditional music theory.
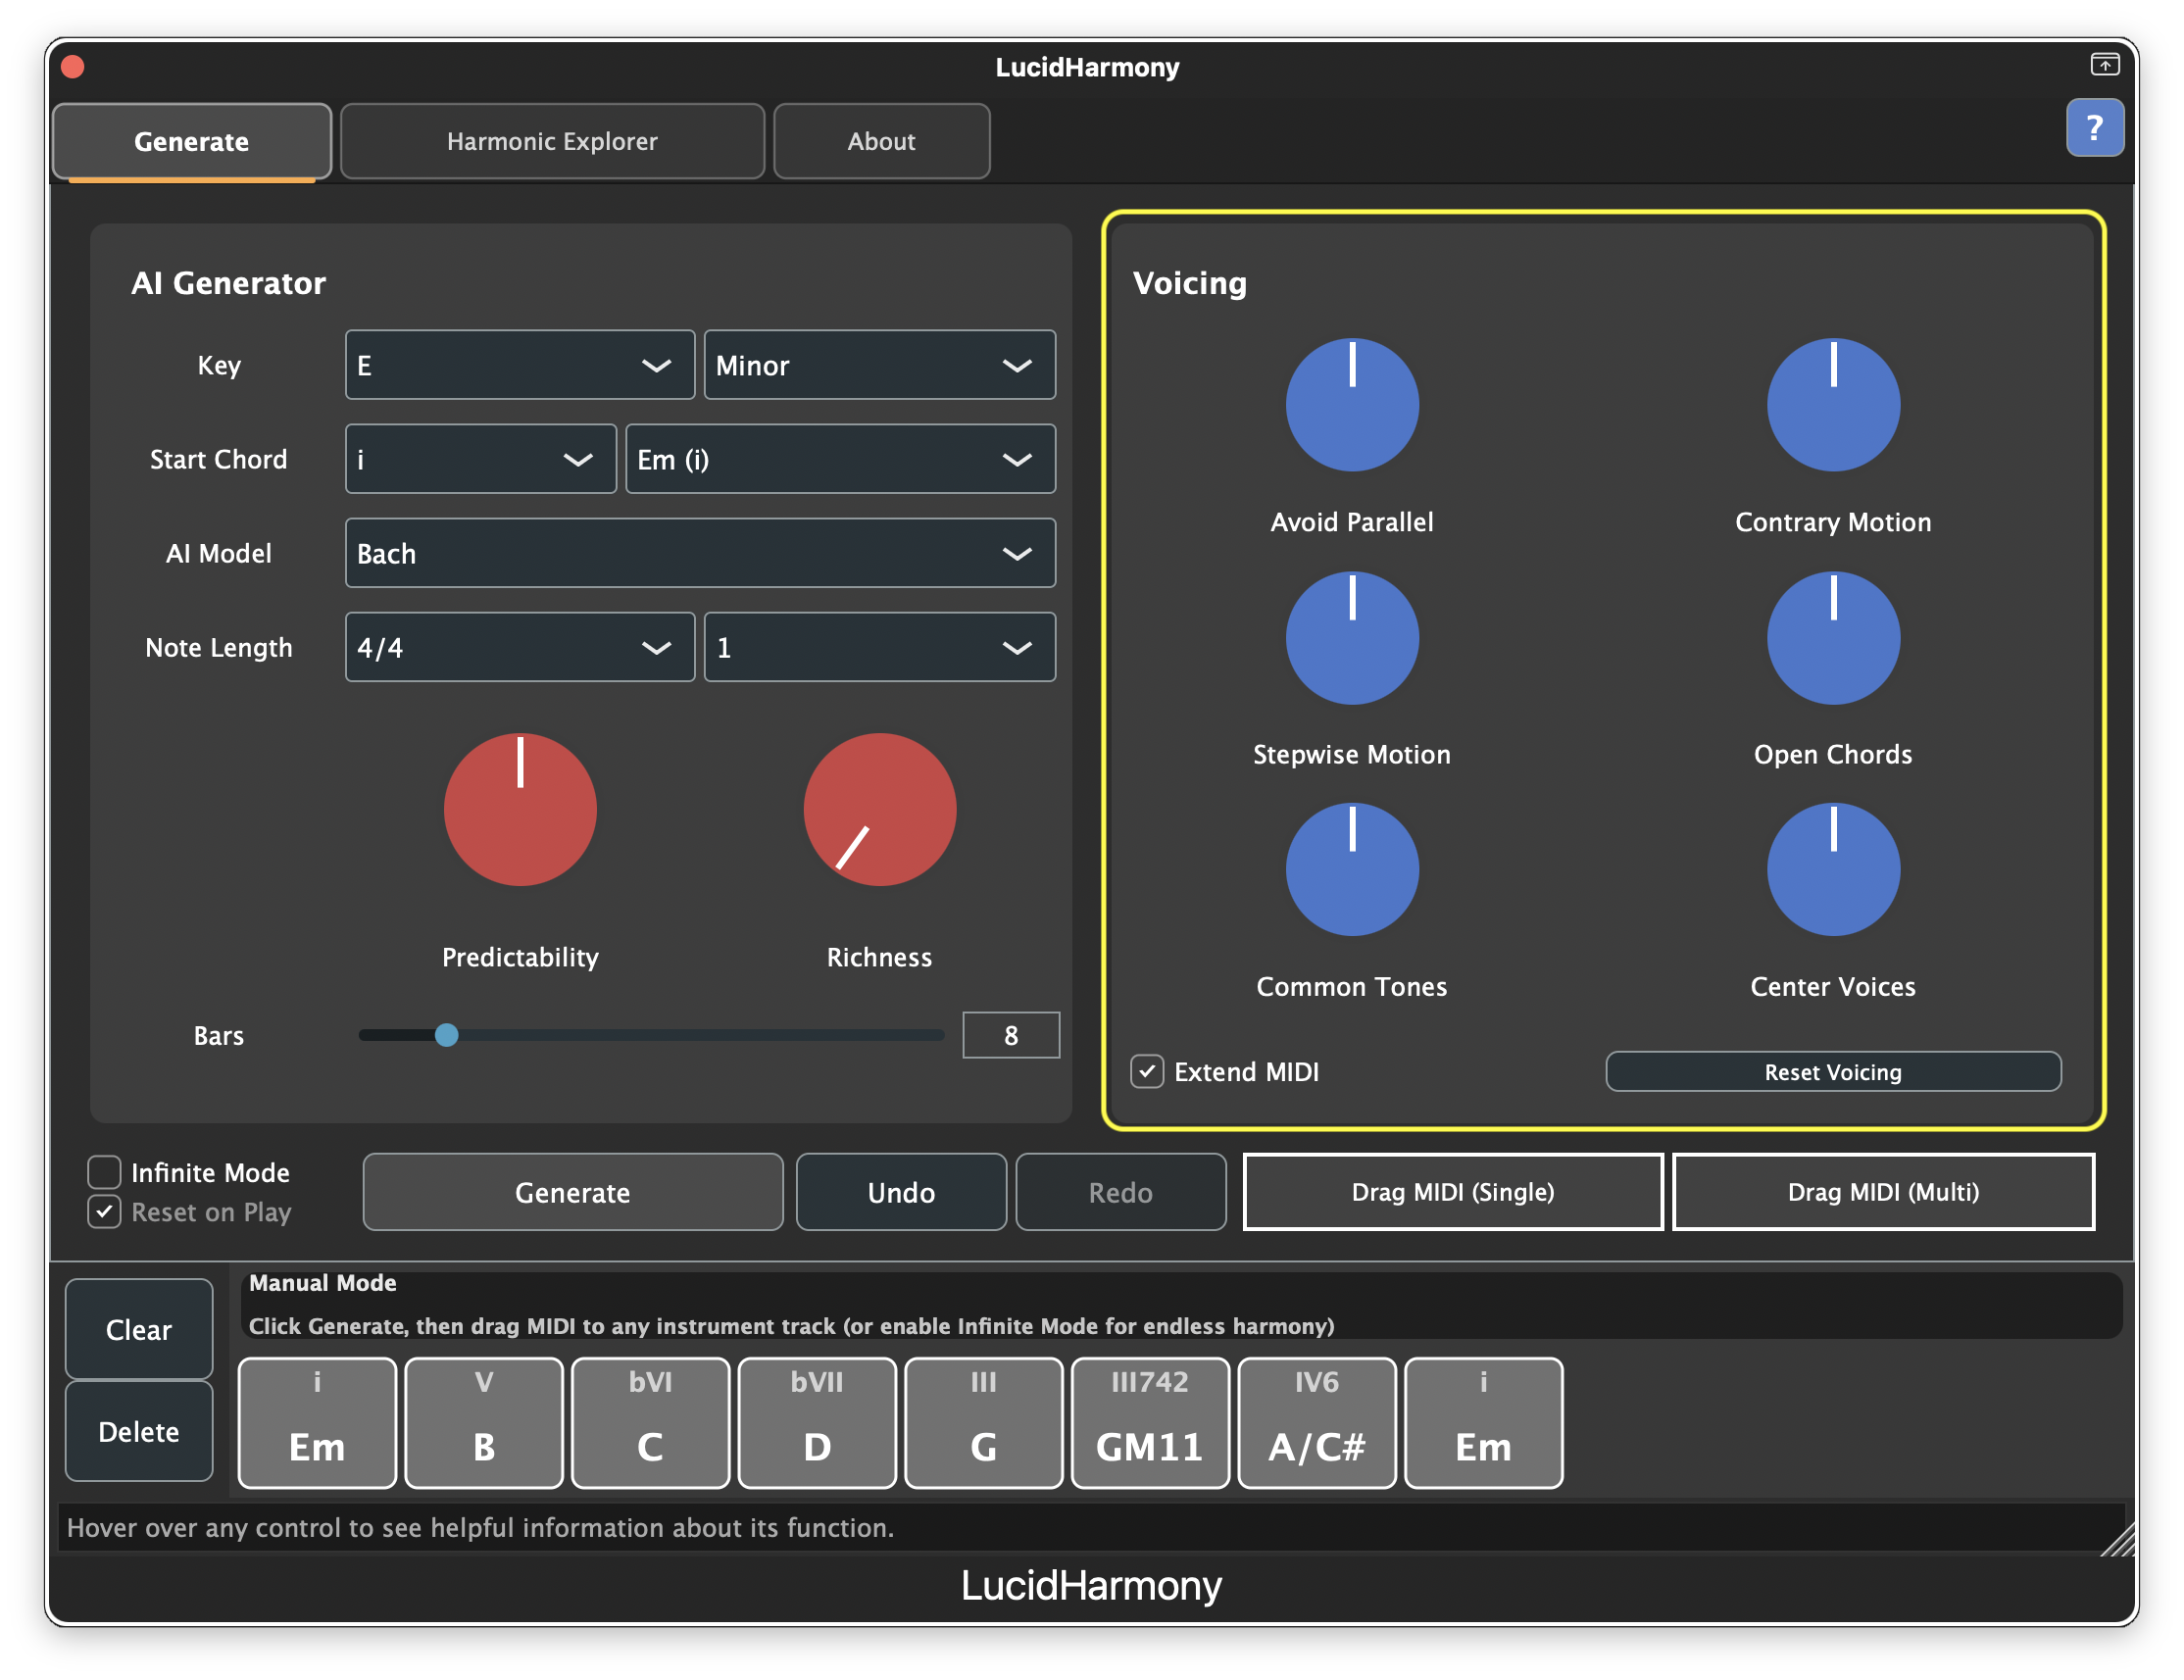
Voicing Parameters
- Avoid Parallel — Reduces parallel fifths and octaves between voices for smoother, more traditional voice leading. (80-95% for strict classical style)
- Contrary Motion — Encourages voices to move in opposite directions, creating independence between parts. (60-80% for independent parts)
- Stepwise Motion — Makes voices prefer small intervals (seconds and thirds) over large leaps for smooth melodic lines. (80-100% for very smooth voice leading)
- Open Chords — Controls spacing between voices. Higher values create wider, more spacious voicings. (70-100% for wide, spacious texture; 10-30% for tight voicings)
- Common Tones — Extends MIDI notes across chord changes where voices share the same pitch, creating smoother transitions. (70-90% for smooth, connected sound)
- Center Voices — Keeps each voice part around the middle of its range rather than wandering too high or low. (60-80% for balanced range)
Voicing Examples
Here you can see two distinct voicings of the same harmonic sequence. Don’t worry if it’s a bit hard to appreciate what’s going on from the screenshots — just know that the best way to understand it is to try two variations and listen for the differences. A good parameter to test is Open Chords.
In the DAW:

As music notation:

As you configure voicing, you can see how features such as Common Tones, Center Voices, Stepwise Motion, and Contrary Motion show up well in the DAW view.
Harmonic Explorer
⚠️ Experimental Feature: This is still in active development, and we’d love to hear your thoughts! If you have feedback or ideas, drop us a line at info@lucidmusician.com.
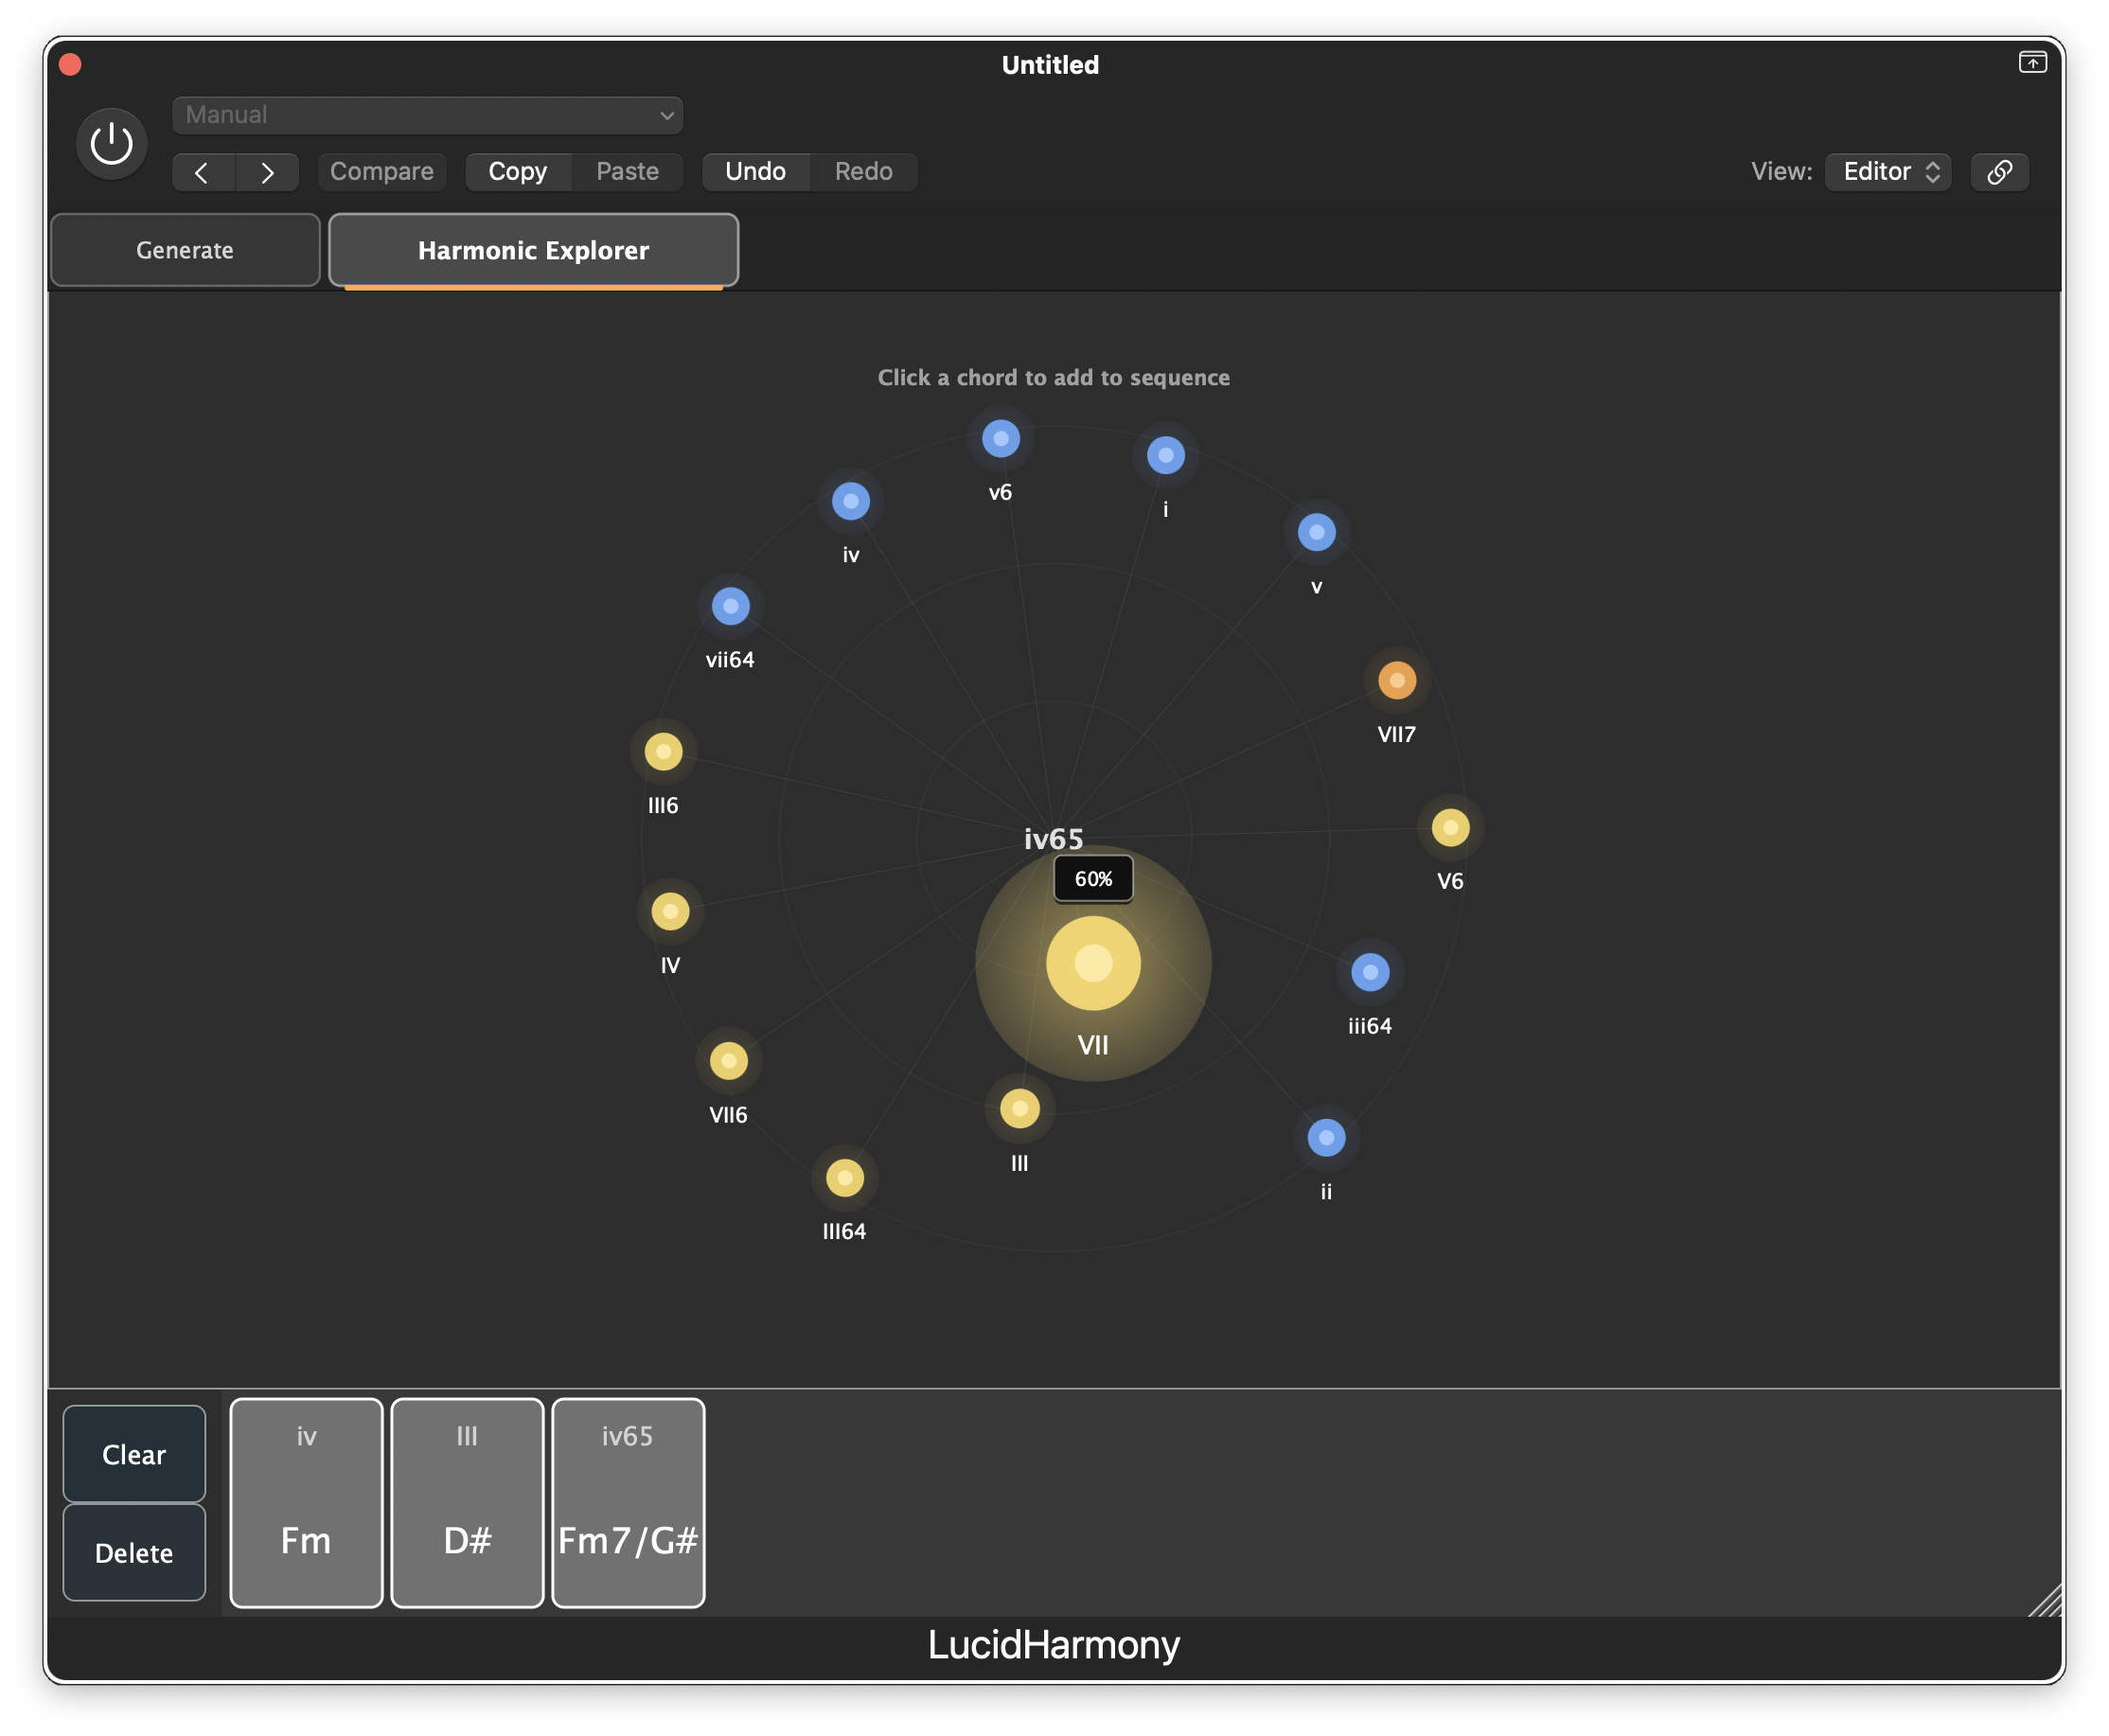
Use it to build your own sequences step-by-step with powerful AI as your guide. In the Harmonic Explorer tab, click chords to assemble a progression. Close (related) chords and harmonic recommendations cluster near the UI’s center. Remote or experimental chords appear further out. Each bubble is color-coded by harmonic function and labeled with both the Roman numeral and the chord symbol in your current key.
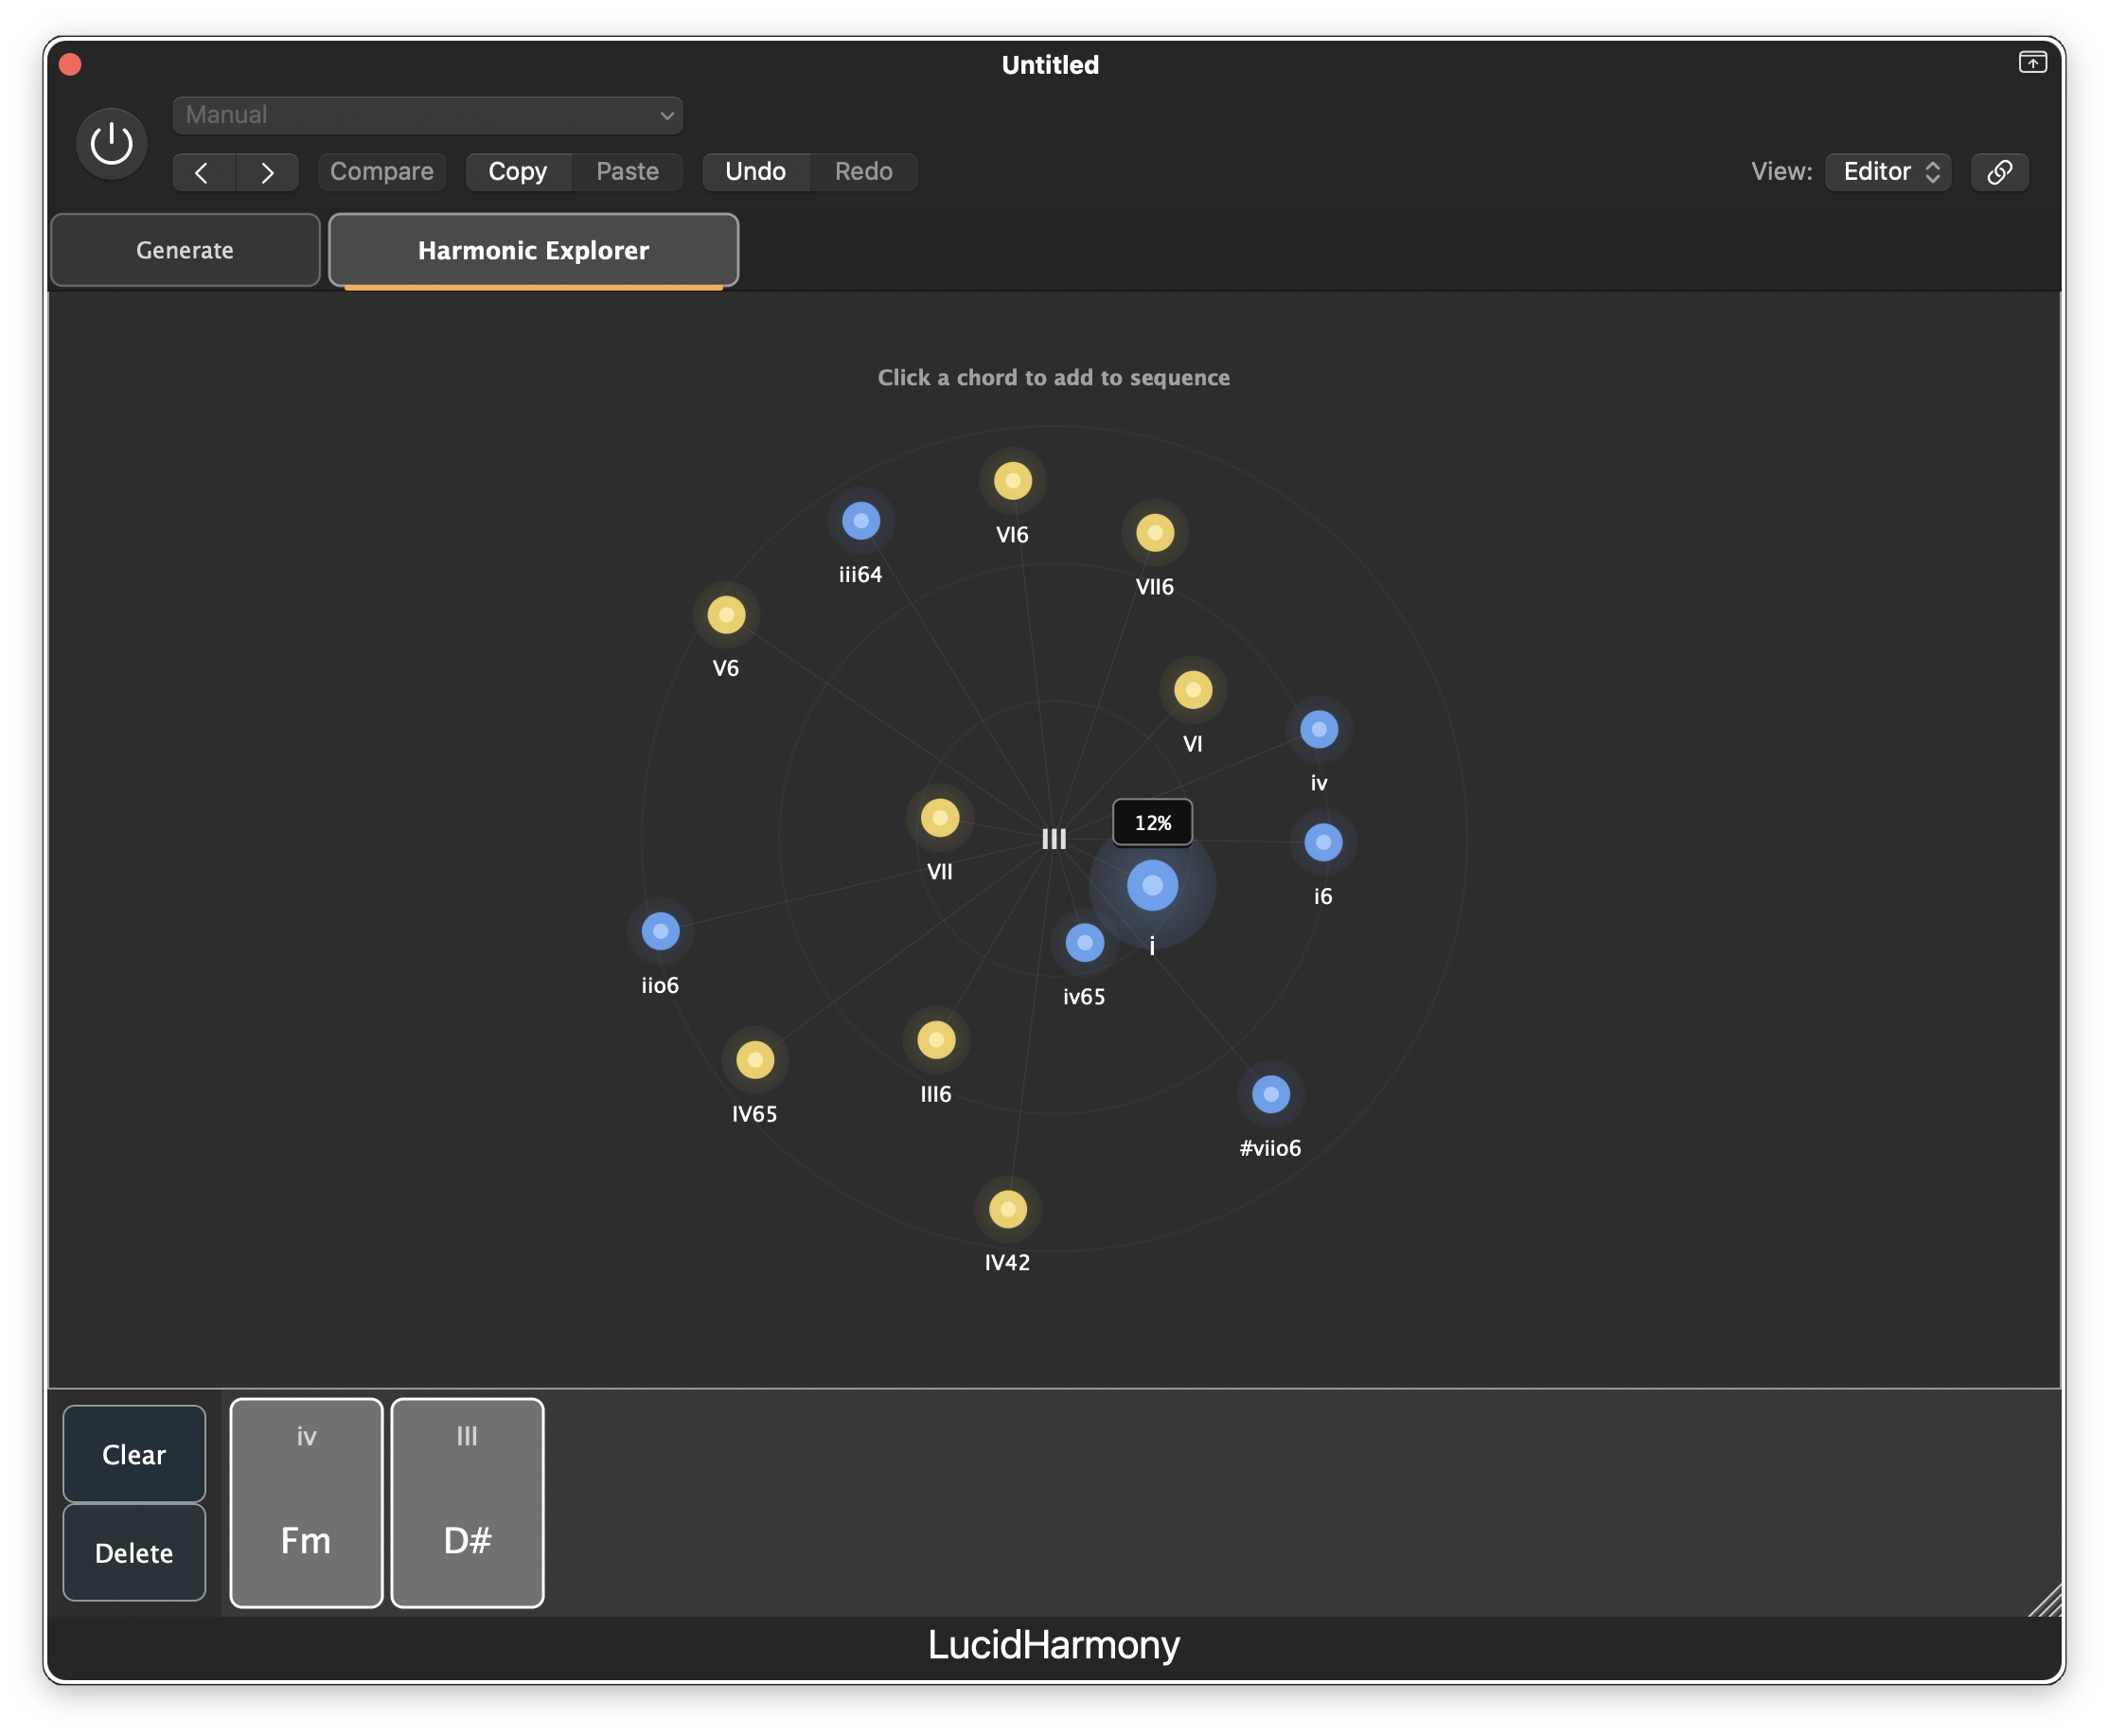
The size of each next-chord bubble reflects how well-established music theory deems it a fit. Hover over any bubble to see its harmonic role and modifier tags (secondary, borrowed, chromatic, etc.). If you know about chords and a bit of music theory, you can see that a VII chord after iv65 is a strong choice. But if theory isn’t your thing or experimental harmony is more your style, just click around — you’ll stay harmonically on track.
Chord Tape Editing
The chord tape is fully interactive. You can select, replace, insert, delete, duplicate, and rearrange chords directly in the tape without regenerating the entire progression. All edits are undoable.
Selecting Chords
Click any chord in the tape to select it. The selected chord is highlighted with a distinct border. When the Harmonic Explorer tab is active, selecting a chord updates the explorer to show AI-suggested alternatives for that position.
Use the Left and Right arrow keys to move the selection through the progression. The tape scrolls to keep the selected chord visible.
Press Escape to clear the selection.
Right-Click Context Menu
Right-click any chord to open the editing context menu:
- Replace with… — Opens the Harmonic Explorer with alternatives for this position. Click a bubble to replace the chord.
- Insert Before — Opens the Harmonic Explorer to insert a new chord before this position.
- Insert After — Opens the Harmonic Explorer to insert a new chord after this position.
- Delete — Removes this chord from the progression. Selection moves to the previous chord.
- Duplicate — Inserts a copy of this chord immediately after it.
Drag to Rearrange
Click and drag a chord to move it to a different position in the tape. A drop indicator shows where the chord will land. Release to complete the move.
Keyboard Shortcuts
- Left/Right Arrow — Move selection
- Delete / Backspace — Delete selected chord
- Escape — Clear selection
Editing with the Harmonic Explorer
The Harmonic Explorer and chord tape work together. When you select “Replace with…” or “Insert Before/After” from the context menu, the Harmonic Explorer tab activates and shows AI-suggested chords based on the surrounding context. Click any bubble to apply the change.
The suggestions are context-aware: the AI considers the chords before and after the edit position to recommend harmonically appropriate alternatives.
Editing During Infinite Mode
When Infinite Mode is active and the DAW transport is playing, editing is restricted to Replace only. Insert, delete, duplicate, and rearrange are disabled during playback to avoid disrupting the real-time streaming. Stop the transport to access all editing operations.
Undo/Redo for Edits
Every edit operation (replace, insert, delete, duplicate, rearrange) is captured in the undo history. Use Cmd+Z / Ctrl+Z to step back through edits, and Cmd+Shift+Z / Ctrl+Shift+Z to redo.
Common Workflows
Creating Background Choral Pads
Settings: Predictability from Very Familiar to Balanced, Harmonic Richness from Colorful to Rich, Note Length of 2-4 bars for long sustained chords, and 16-32 bars total.
Voicing: Common Tones at 80-100%, Stepwise Motion at 60-80%, and Open Chords at 40-60%.
Pro tip: Use Infinite Mode for endless evolving pads.
Ambient & Atmospheric Textures
Settings: Predictability from Surprising to Very Surprising, Harmonic Richness from Rich to Very Rich, Note Length of 4-8 bars, with Infinite Mode enabled.
Voicing: Common Tones at 20-40%, Open Chords at 70-100%, and Contrary Motion at 60-80%.
Jazz-Influenced Progressions
Settings: AI Model set to Bach or Corelli, Predictability from Balanced to Surprising, and Harmonic Richness from Rich to Very Rich.
Voicing: Common Tones at 40-60%, Stepwise Motion at 50-70%, Contrary Motion at 60-80%, and Avoid Parallel at 70-90%.
Minimalist Loops
Settings: Predictability at Very Familiar, Harmonic Richness from Simple to Some Color, Note Length of 1/4 to 1/2 bar, 4-8 bars total, with Infinite Mode enabled.
Voicing: Common Tones at 80-100%, Stepwise Motion at 80-100%, and Open Chords at 20-40%.
Troubleshooting
Plugin Doesn’t Appear in DAW
macOS:
- Verify installation location:
~/Library/Audio/Plug-Ins/Components/(AU) or~/Library/Audio/Plug-Ins/VST3/(VST3) - Rescan plugins in your DAW
- Check macOS security settings: System Preferences → Security & Privacy → General
- Restart your DAW
Windows:
- Verify installation location:
C:\Program Files\Common Files\VST3\ - Check VST3 path in your DAW settings
- Rescan plugins
- Run DAW as Administrator
- Check Windows Defender exceptions
No Sound / Silent Output
- Check MIDI input — LucidHarmony requires MIDI to trigger playback
- Verify track is armed/enabled and not muted
- Check plugin output routing
- Generate a progression first — click Generate to create chords
Crackling or Distorted Audio
- Increase buffer size in your DAW’s audio preferences (try 512 or 1024 samples)
- Check CPU usage — close other applications
- Update audio drivers
- Disable other plugins temporarily to isolate the issue
”Generate” Button Does Nothing
- Ensure a key is selected
- Ensure bars is set to a reasonable value (4-32)
- Ensure an AI model is selected
- Check your DAW’s console/log for errors
- Try resetting to defaults: C Major, 8 bars, Balanced predictability
Generated Progressions Sound “Wrong”
- Adjust Predictability — lower for more familiar, raise for more surprising
- Try different AI models — each has distinct character
- Generate more options — click Generate 20-30 times
- Check your key and mode selection
- Adjust voicing — same progression can sound very different with different voicing
Can’t Export MIDI to DAW
- Drag to the arrangement/timeline view, not the mixer
- Drag to an empty area to create a new MIDI clip
- Ensure you’re dragging to a MIDI or Instrument track, not an audio track
- Check DAW compatibility - most DAWs support MIDI drag and drop
Voices Sound Too Close Together
- Increase “Open Chords” slider to 70-100%
- Decrease “Center Voices” slider
- Export as Multi and manually transpose voices by octaves in your DAW
Voices Sound Too Spread Out
- Decrease “Open Chords” slider to 0-30%
- Increase “Center Voices” slider
Voice Leading Sounds Jumpy
- Increase “Stepwise Motion” to 80-100%
- Increase “Common Tones” to 70-100%
- Lower “Contrary Motion” if you want more parallel motion
Tips & Best Practices
- Generate liberally—don’t settle for the first result. Click Generate 10-20 times
- Save everything—drag progressions to your DAW immediately. You can always delete later
- One parameter at a time—change one setting, regenerate, compare. Learn what each control does
- Use Infinite Mode for discovery—let it play while you work on other parts of your track
- Export both Single and Multi—having both gives you options during arrangement
- Experiment with AI models—each model has a distinct character
- Voice the same progression multiple ways—one harmonic progression can serve multiple sections with different voicings
- Start simple—use 8 bars, Balanced predictability, Colorful richness for first use
- Use Undo/Redo - Cmd+Z (Mac) / Ctrl+Z (Windows) to compare different generations
Support
If you’re experiencing problems not covered here:
- Check for updates—visit lucidmusician.com for the latest version
- Contact support—submit a support ticket
- Include: OS version, DAW name and version, LucidHarmony version, detailed description, screenshots
- Email: support@lucidmusician.com
The Upshot
This is a novel, powerful AI chord generator. Our custom AI model draws on deep knowledge from master composers and centuries of music theory.
The possibilities are endless. Add LucidHarmony to your workflow today!